OBTAINING DATA FROM A RAD7 |
|
|
This section will provide instructions on connecting a RAD7 to the computer, using CAPTURE to detect the RAD7, downloading the RAD7 data, and displaying the data as a graph. |
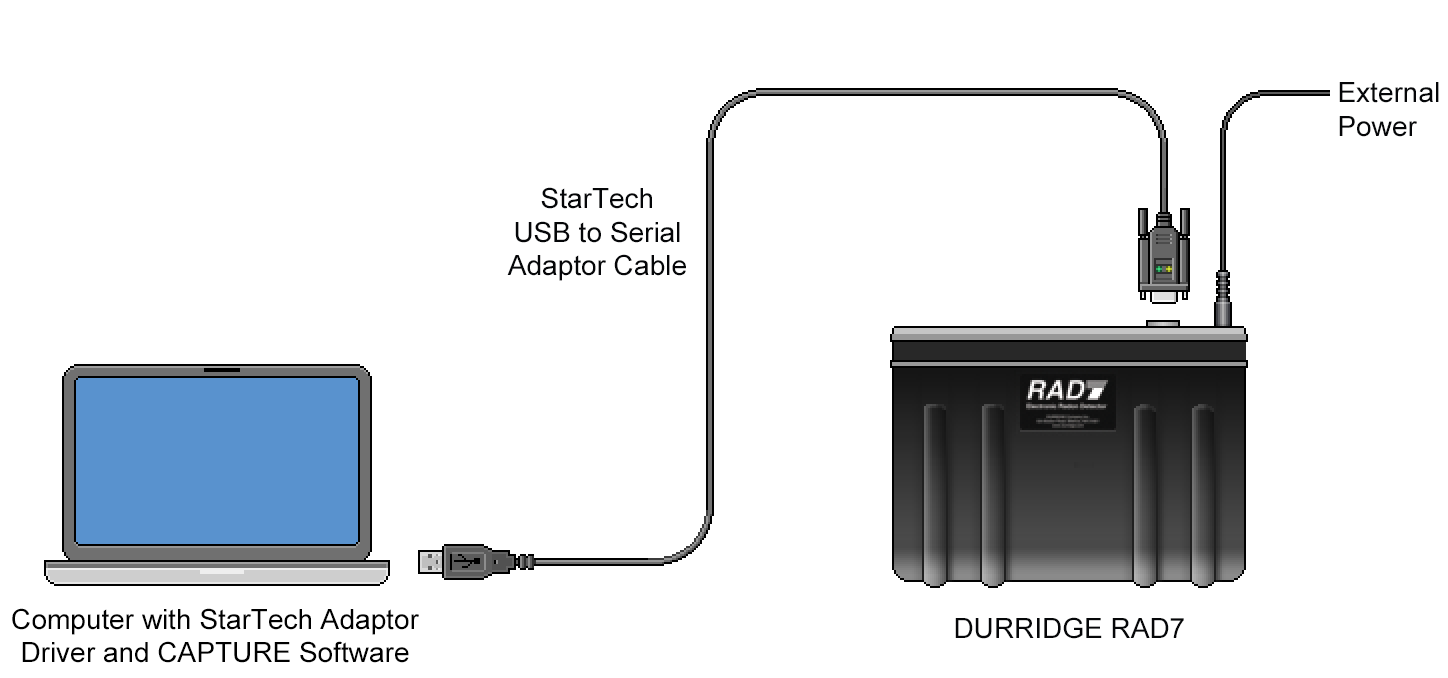
Make sure the RAD7 contains several valid data records and that it is plugged into a stable power source and powered On. The included USB to Serial adapter should be used to connect the RAD7 to your computer. It may be necessary to install USB to Serial adaptor driver software on your computer. Drivers are available at the Software Drivers page at the DURRIDGE website. If your computer has a physical serial port, it is possible to instead use an RS232 DB9 female to female null modem cable to connect the RAD7 directly to your computer's serial port. For wireless RAD7 connectivity, a Bluetooth Serial adapter may be used to facilitate communication, as explained in the Long Distance Connectivity section. DURRIDGE offers preconfigured Parani SD-1000 Serial to Bluetooth Adapters as an optional RAD7 accessory. Figure 1 shows how to connect the RAD7 to a computer using two different kinds of USB to Serial adapters: the StarTech adapter (top), and the Keyspan adapter (bottom). |
|
|
|
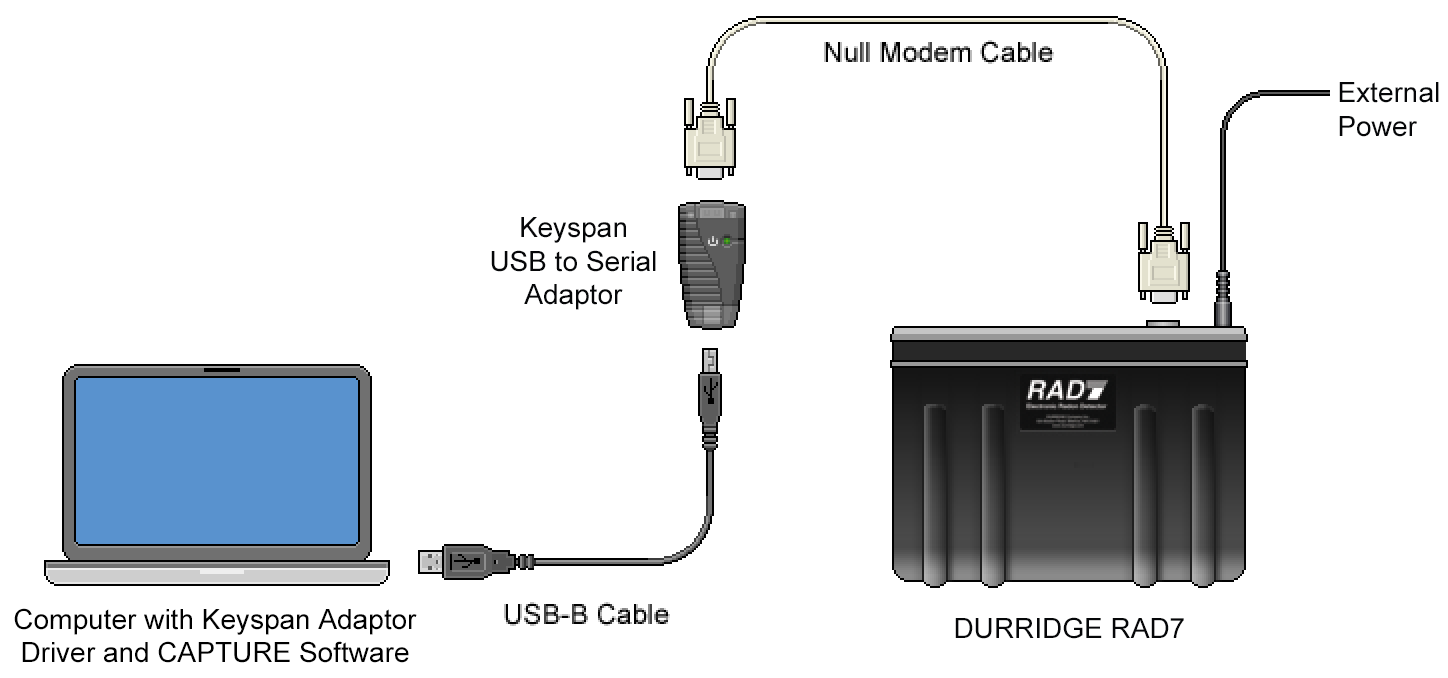
When CAPTURE starts up, the Main Window will appear. This window contains controls used for downloading RAD7 data and performing other RAD7 communication operations, as well as opening existing RAD7 data files
from disk. When the Main Window first appears, some controls will be disabled. These controls become active only when a connected RAD7 has been detected. |
|
|
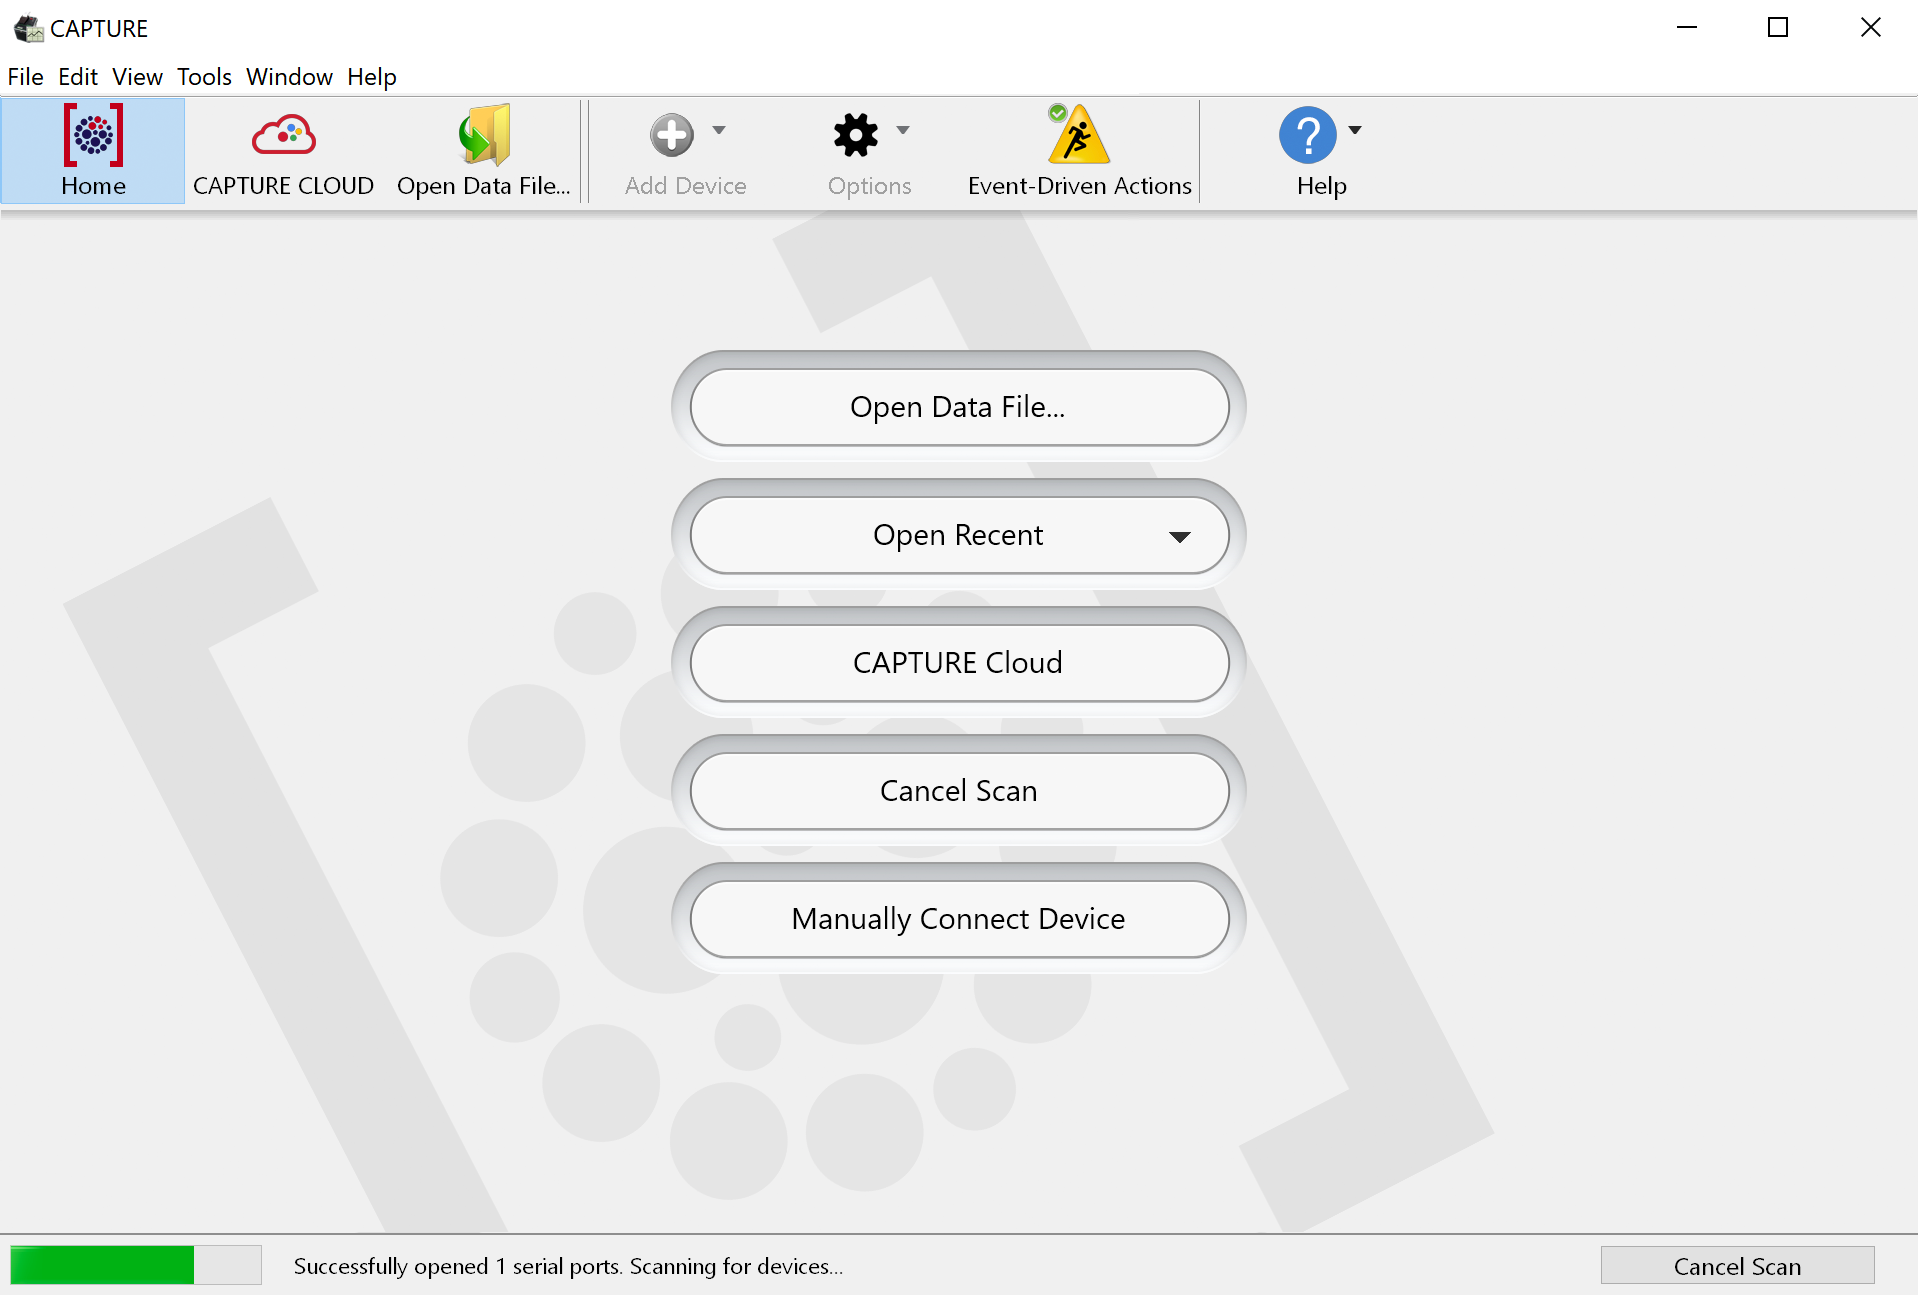
If RADLINK is present on the RAD7 and the instrument is connected to the computer, CAPTURE should detect the RAD7 automatically as the program launches. If it does not, click the Scan For Devices button at the lower right corner of CAPTURE's Main Window. Automatic RAD7 detection can be enabled or disabled in CAPTURE's Preferences Window. The option is enabled by default. When CAPTURE is scanning for RAD7s, a progress bar will appear at the bottom of the Main Window, and any detected RAD7s will be added to the window's toolbar, as shown in Figure 2, above. If RADLINK is not present on the RAD7, click the Add Device button in the toolbar, which is shown in Figure 3, below, and choose Add RAD7 from the menu that appears. The Connection Panel will appear, containing controls for specifying the Connection Type, Serial Port, and Baud Rate, as shown in Figure 4. The Connection Type pop-up menu should be set to "Serial Port". (The "Network" option is for connecting to a RAD7 at a remote location. This may require some additional configuration, as discussed in the Long Distance RAD7 Communication section.) The Serial Port pop-up menu should be set to the name of the serial port to which the RAD7 is connected. Finally, the Baud Rate pop-up menu should be set to the baud rate of the RAD7, which is typically 9600. For a RAD7 without RADLINK, the baud rate will always be 1200. After specifying these settings, click the Connect button. |


|
Note that it is possible to manually connect to a RAD7 even if it has RADLINK installed, however it is more convenient to let CAPTURE detect it automatically using the Scan for Devices button. If RADLINK is installed, the RAD7's baud rate may be checked and altered using the RAD7's keypad. To do this select the Special menu command on the keypad and press [ENTER], and then navigate to the SetBaud command and press [ENTER] again. Use the left and right arrow keys to choose the desired baud rate, and press [ENTER] once again to confirm the selection. When downloading data manually, whichever baud rate is chosen on the RAD7 must also be chosen in CAPTURE. If RADLINK is not installed, the Special menu commands will be unavailable and therefore the baud rate can not be checked on the RAD7, however it can be assumed to be 1200. |
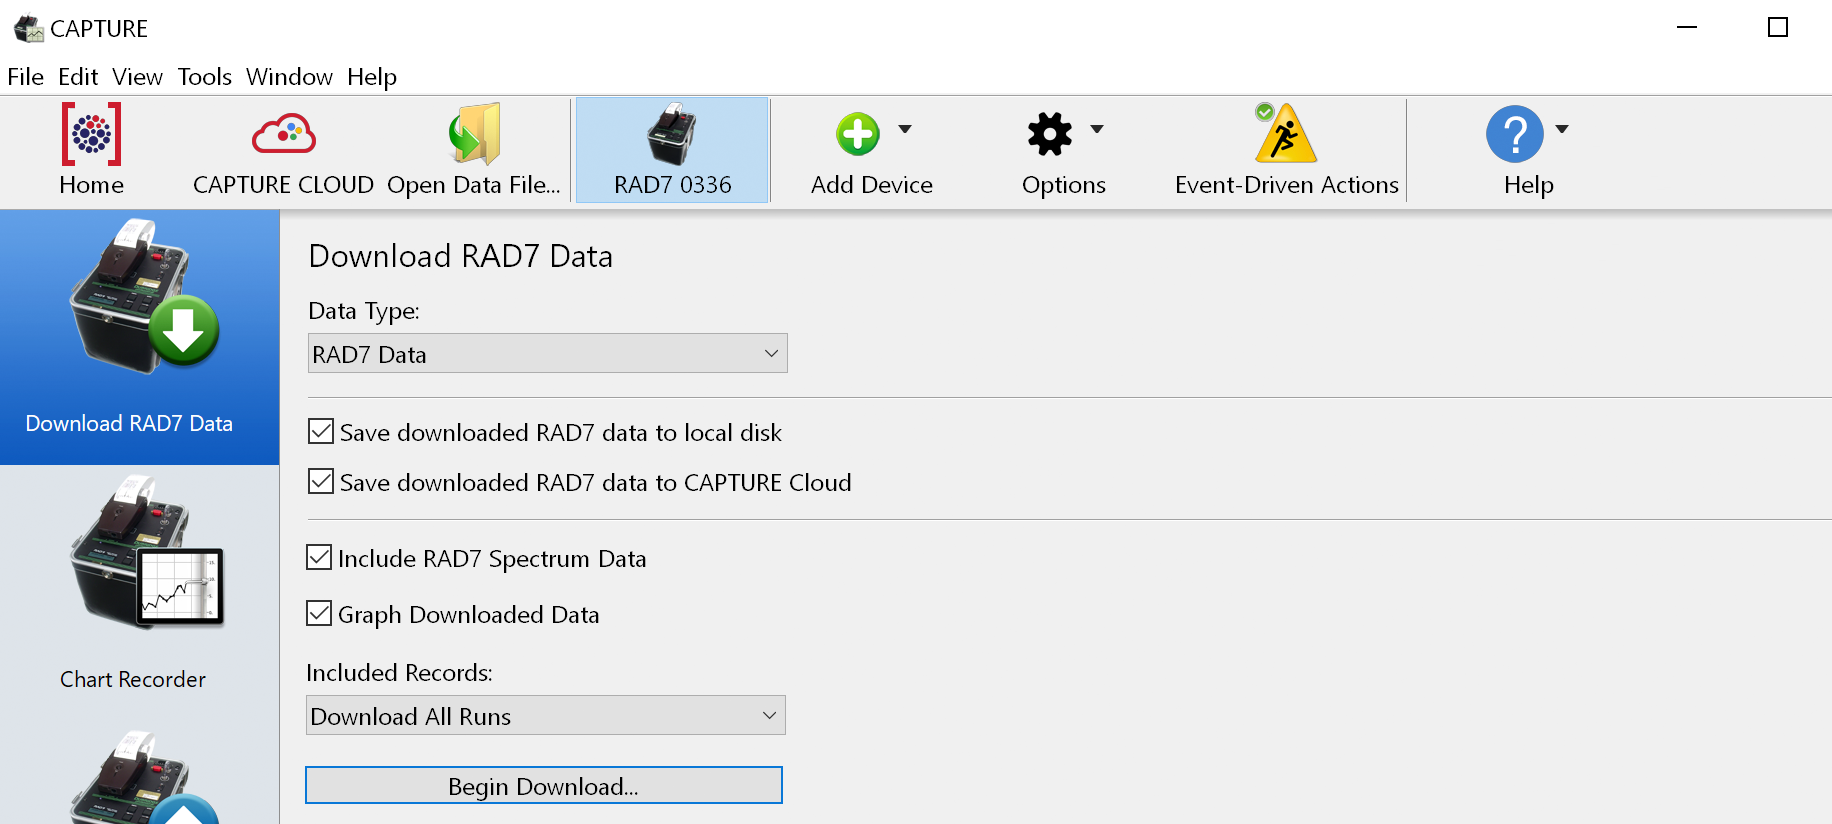
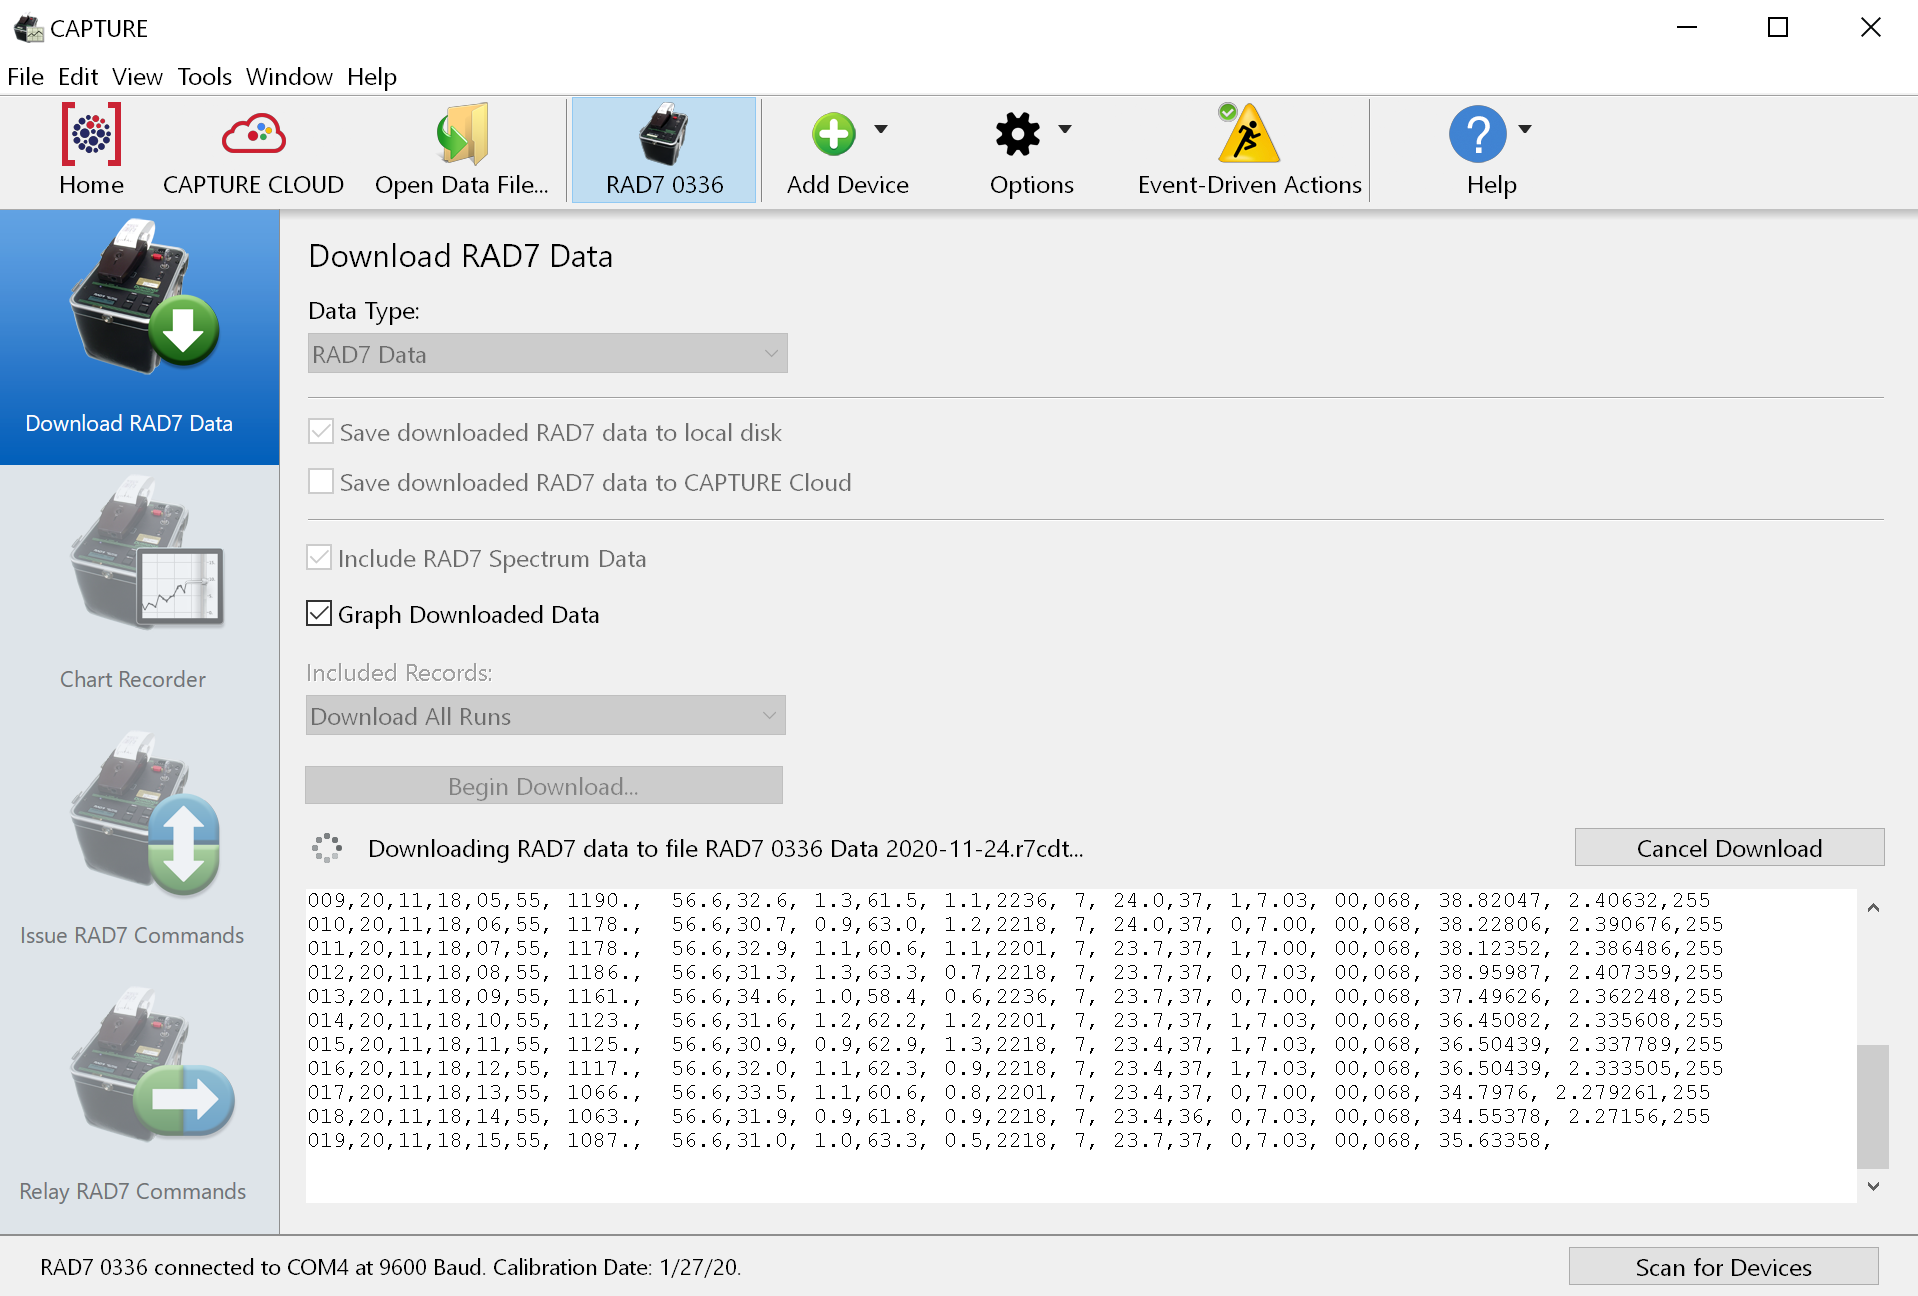
Downloading a RAD7's contents to your computer makes it possible to graph, analyze, and share the RAD7 data, as well as preserve it against accidental erasure or corruption. It is recommended that the data be downloaded upon completion of each on-site test, or as frequently as is practical. Along the left side of CAPTURE's main window is a column of icons for connecting to several panels used for performing common RAD7 communication operations. These include Download RAD7 Data, Chart Recorder, Issue RAD7 Commands, and Relay RAD7 Commands. After CAPTURE has connected to a RAD7, a series of brief tests will be performed to determine which communication operations are possible. The Download RAD7 Data panel is enabled for all RAD7s, and the other panels will be enabled as long as the RAD7 contains RADLINK. Select the Download RAD7 Data panel if it is not already highlighted. The following controls will appear, as shown in Figure 5, below:
If RADLINK software is installed on the RAD7, the downloaded RAD7 data file will contain supplementary information including the RAD7 device identity, thoron data, and run and cycle numbers, and the file name will use the .R7CDT extension. Files lacking this supplementary data use the .R7RAW extension. While R7CDT files are somewhat larger on disk than R7RAW files, both are quite compact and storage requirements should not be a concern. Be aware that if the Include RAD7 Spectrum Data checkbox is checked, the resulting RAD7 data file will use a sophisticated text-based format that that does not resemble the RAD7's raw output. If the Include RAD7 Spectrum Data checkbox is not checked, the data file will use a simple format consisting of the RAD7's unaltered responses to the basic data download commands. The latter format is easier to read in a text editor such as Notepad for Windows or TextEdit for macOS. |
|
|
After specifying the appropriate download parameters, click the Begin Download button. You will be prompted to specify a name and location for the downloaded RAD7 data file. If the RAD7 has RADLINK, data will begin arriving almost immediately, as shown in Figure 6, below. Otherwise it will be necessary to start the RAD7 manually. To start the RAD7 manually, use the RAD7 keypad to choose Data, and then Com. Then key in the desired run number and press [ENTER]. You will have sixty seconds to complete this procedure before CAPTURE aborts the download due to an absence of incoming data. The download may be canceled at any point using the Cancel Download button. |
|
As data records are received, they will fill a text area at the bottom of the window as shown in Figure 6. When the data retrieval process is complete, the acquired data will be saved to the specified location on disk and/or to CAPTURE CLOUD. If the Graph Downloaded Data checkbox is checked, a Graph Window will appear, and it will display the acquired data as shown in Figure 7, below. |
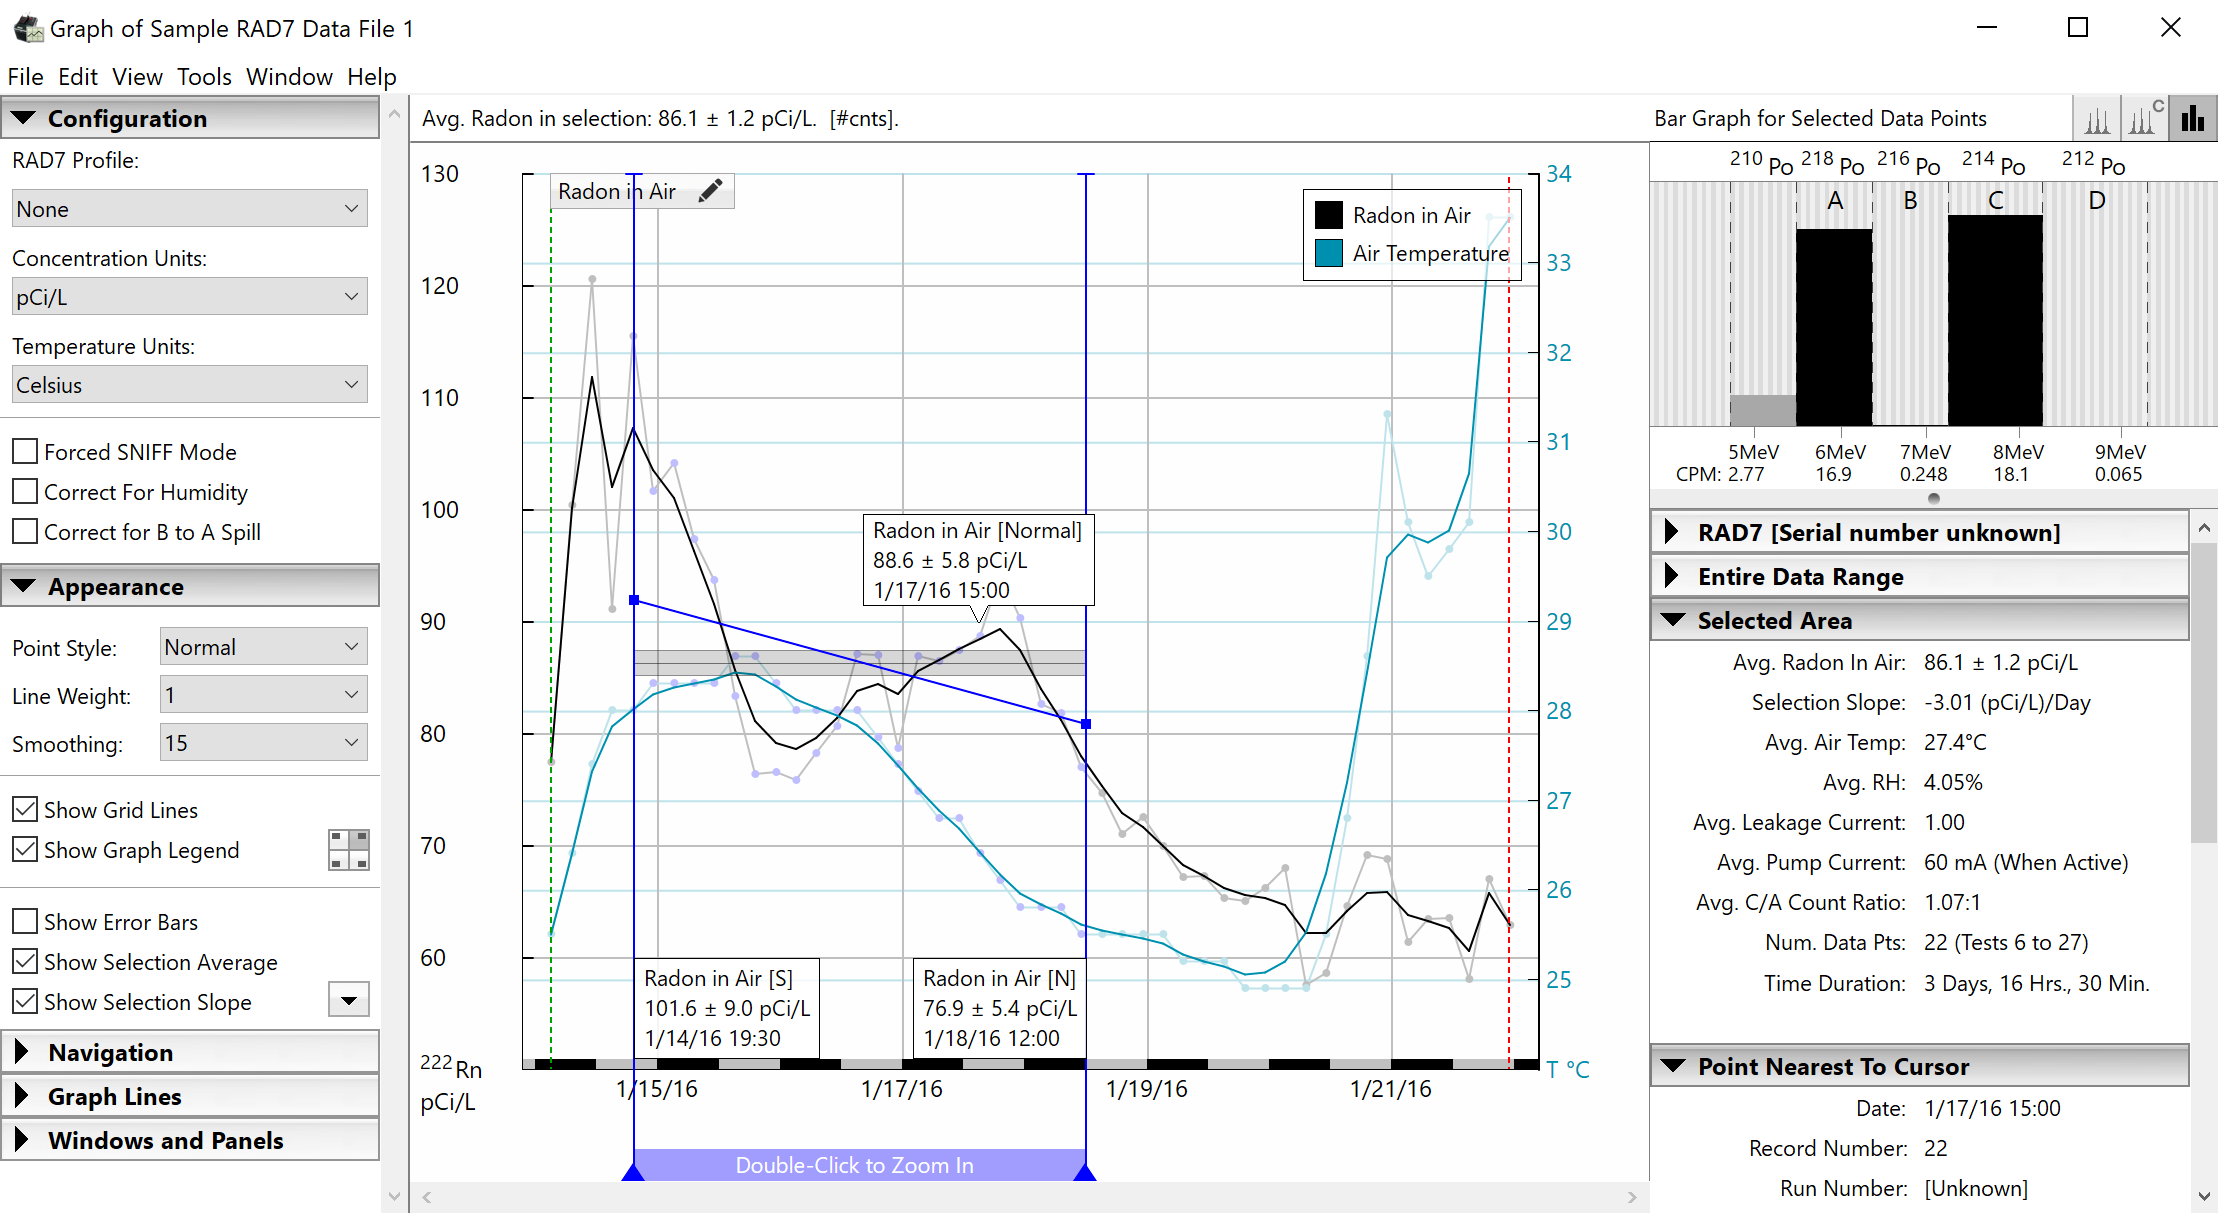
The Graph Window displays radon concentration data across a timeline, with higher radon concentrations plotted higher on the graph image. In addition to radon, a graph may display thoron, temperature, and humidity data.
A multitude of controls are available for navigating the RAD7 data graph, as discussed in the Graph Window Navigation section. Graph data can be configured to reflect particular experimental setups involving radon in water accessories; this is discussed in the Setting Run Parameters section. Graph data and graph images can be exported and printed for use in spreadsheets and presentations using the Export commands in the File Menu. For more details, please see the Data Export, Reports, and Printing section. |
|
|
When the Graph Window opens, it may be necessary to specify the Run Parameters. For most projects it will be appropriate to leave the Run Parameters at their default settings, but if the radon data was collected with the use of certain DURRIDGE accessories such as the RAD AQUA, Water Probe, or Big Bottle System, then some configuration will be required. This is done using the Run Parameters Window. Please see the Setting Run Parameters Section for more details. |
CAPTURE makes it easy to quickly download all of the data from each connected RAD7. Once the RAD7s have been discovered, the Download Data From All RAD7s command will become enabled in the Options menu located on the Main Window toolbar. |
|
|
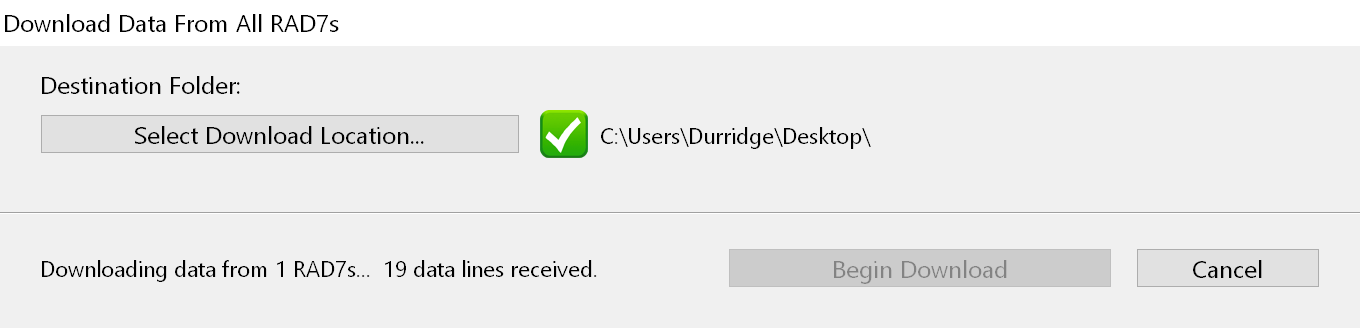 Figure 8: Downloading data from all connected RAD7s.
 |