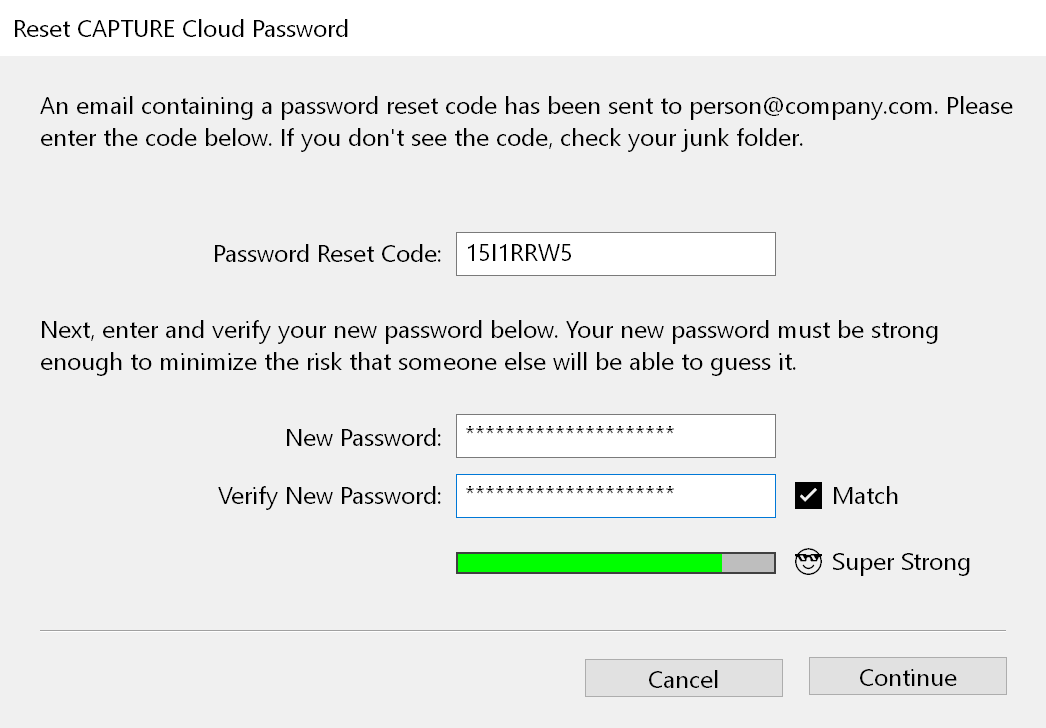
Figure 1: Signing in to CAPTURE CLOUD.
CAPTURE CLOUD |
|
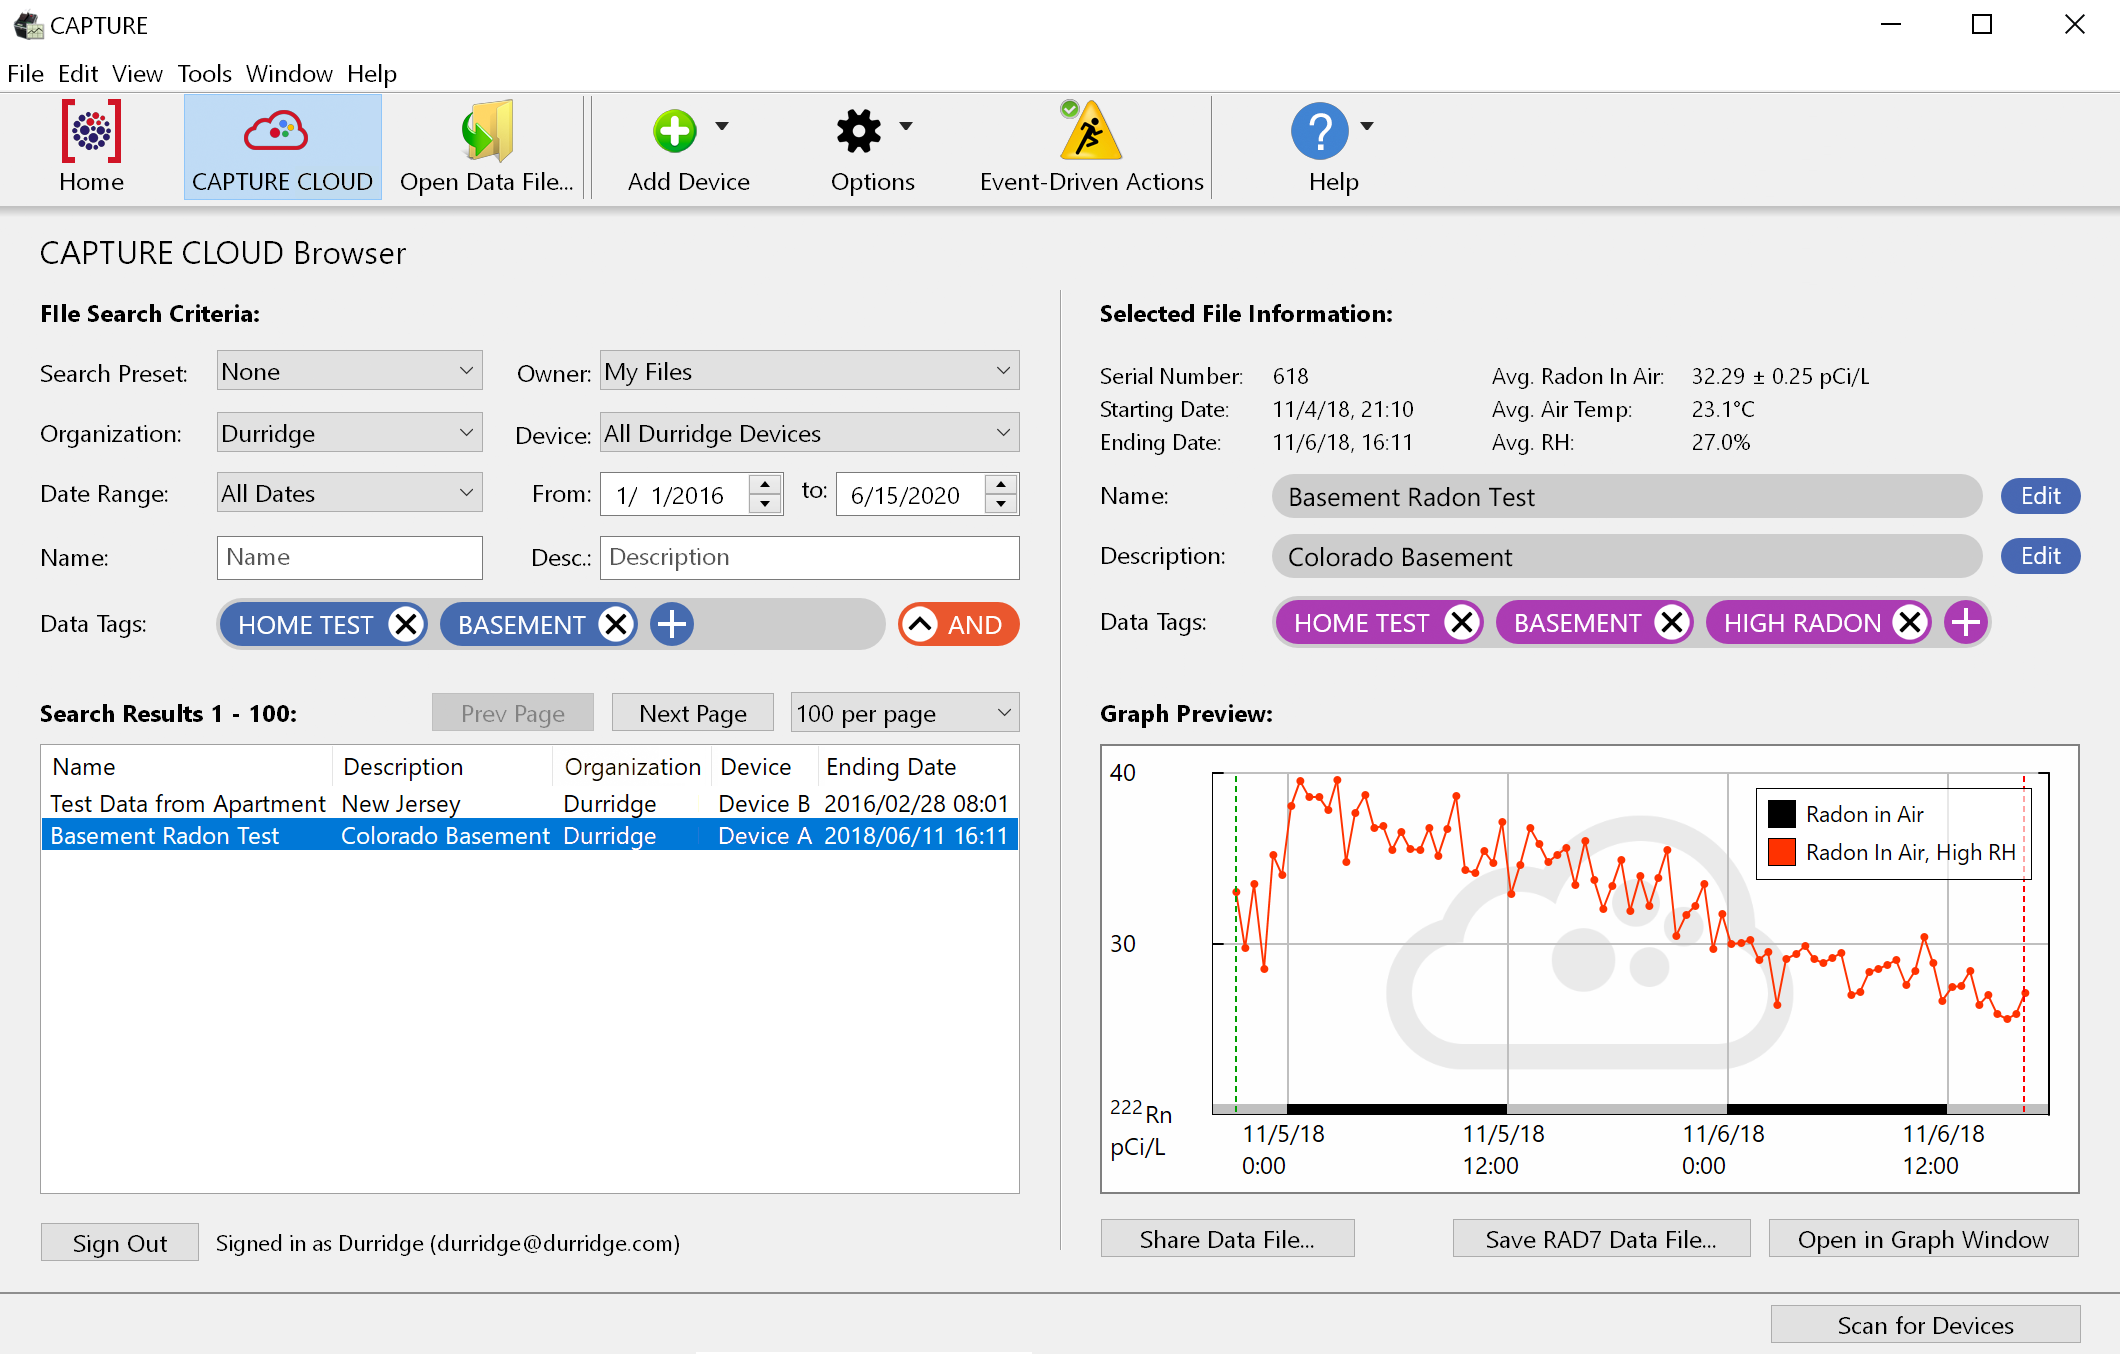
CAPTURE CLOUD is a subscription-based service for storing, organizing, and sharing RAD7 data from any computer running CAPTURE. Shared data can be made accessible to any authorized CAPTURE CLOUD user. CAPTURE CLOUD Feature Summary When signed in to CAPTURE CLOUD, RAD7 data can be saved to a CAPTURE CLOUD server hosted by DURRIDGE, and then later retrieved, modified, and saved back to the CAPTURE CLOUD server. A Data Browser lets you explore collections of RAD7 record sets, and issue search queries to find data from a particular organization, RAD7 instrument, date range, plus additional criteria. RAD7 data can be assigned custom searchable tags to associate it with a particular project, job site, technician or other attributes. When a RAD7 record set is selected from the list of search results, it can be viewed and edited using CAPTURE's Graph Window. RAD7 data that has been uploaded to CAPTURE CLOUD becomes available to CAPTURE CLOUD users who belong to the organization that owns the RAD7 device from which the data came. Additionally, data can be shared with select users from outside one's organization. |
| Setting Up a User Account |
To sign up for CAPTURE CLOUD, visit the CAPTURE CLOUD page on the DURRIDGE website at https://durridge.com/software/capture-cloud and use the online store to place an order for a CAPTURE CLOUD subscription. You will not have to submit payment information right away, because there is a free trial period. After completing your order, you will receive a confirmation email containing a link to an account registration form. Use this form to provide details about your organization, the DURRIDGE devices you wish to connect to CAPTURE CLOUD, and the users you want to have access to the account. Note that an unlimited number of users can be added at no additional charge. After you complete the registration form a DURRIDGE administrator will process your submission, and you will receive an email containing the sign-in credentials needed for you and other users in your organization to log in to your new CAPTURE CLOUD account. Once logged in, you can store and retrieve data from the DURRIDGE devices belonging to your organization. Updating Account Settings If you wish to modify your CAPTURE CLOUD account by adding or remove users or RAD7 devices, go to the CAPTURE CLOUD web page at https://durridge.com/software/capture-cloud and complete the Update Account Settings Form, which is found near the top right section of the page. |
| Signing in to CAPTURE CLOUD |
To sign in to your CAPTURE CLOUD account, click the CAPTURE CLOUD toolbar button at the top of the Main Window, and then enter your email address and password, as shown in Figure 1, below. Then click the Sign In button. Check the Remember sign-in credentials checkbox if you do not want to have to reenter your email address and password each time you connect to CAPTURE Cloud. Check the Sign in automatically at launch checkbox to bypass the sign-in panel in the future. If you forget your password, or wish to change it, click the Reset Password link under the Sign In button, and refer to the Password Resetting section below. Once you have signed in, the CAPTURE CLOUD Browser will appear, allowing you to locate files that have been uploaded from your organization's RAD7(s). The CAPTURE CLOUD Browser is explained in depth later in this section. |
|
You will remain logged in to your CAPTURE CLOUD account until you quit the CAPTURE application or sign out of CAPTURE CLOUD. To sign out, use the Sign Out button at the bottom left corner of the CAPTURE CLOUD Browser. You will be returned to the CAPTURE CLOUD Sign-In Panel, where you or another user may sign back in. |
|
|
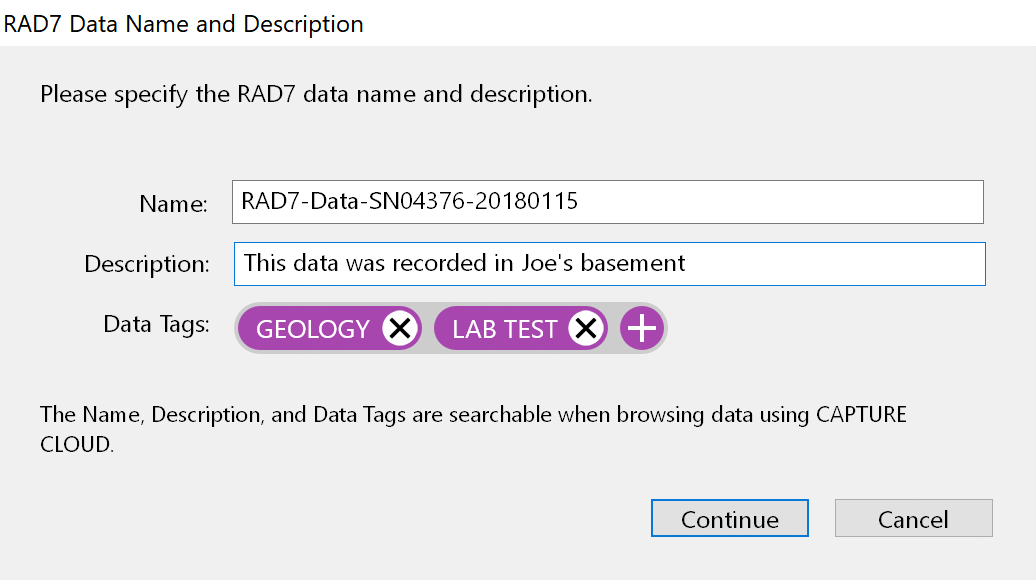
There are four situations in which RAD7 data may be saved to CAPTURE CLOUD: when data is being downloaded from a RAD7, when data is visible in a Graph Window or the Chart Recorder, when data is being logged in the Chart Recorder, and when a data file is dragged and dropped into the CAPTURE CLOUD Browser. Note that in each case it is necessary to be signed in to CAPTURE CLOUD, as described above. Saving data to CAPTURE CLOUD when downloading from a RAD7 When data is being downloaded from a RAD7 to CAPTURE, it can be saved to your local disk and/or your CAPTURE CLOUD account. To save the data to CAPTURE CLOUD, check the Save Data to CAPTURE CLOUD Checkbox in the Main Window's Download RAD7 Data panel. As the download begins you will be prompted to provide a name and description for the data set as shown in Figure 2, below. It is helpful to choose a unique and memorable name and description in order to be able to easily locate the data at a later time using the search tools in the CAPTURE CLOUD Browser.
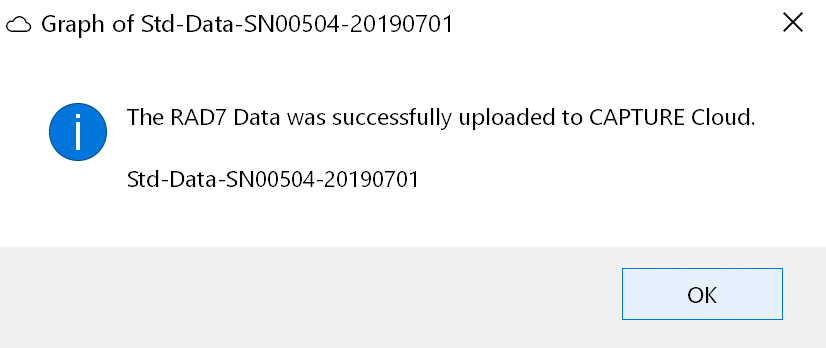
Once the data has been fully downloaded from the RAD7 and verified, it will be saved to CAPTURE CLOUD. Upon completion, a notification dialog will appear, confirming that the data was successfully saved to the cloud. |
Saving Graph Window or Chart Recorder data to CAPTURE CLOUD RAD7 data from a CAPTURE Graph Window or the Chart Recorder can be saved to your CAPTURE CLOUD account. First open a Graph Window or view the Chart Recorder as necessary, by choosing File --> Open Data File... and selecting a RAD7 data file to graph. Then choose File --> Save to CAPTURE CLOUD. You will be prompted to confirm the RAD7 data name and description, as shown in Figure 2.
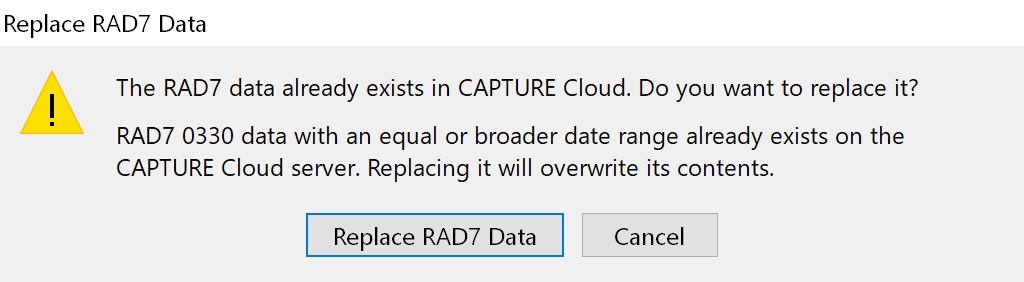
Note that RAD7 data may only be uploaded to CAPTURE CLOUD if it was obtained from a RAD7 containing RADLINK. If RADLINK is present, the serial number of the RAD7 will appear in the heading of the Graph Window's Statistics Panel. Once the data has been uploaded, it will appear in the Search Results list in the lower left section of the CAPTURE CLOUD Browser, as shown in Figure 5, below. Saving data to CAPTURE CLOUD by dragging and dropping It is also possible to save a RAD7 data file to CAPTURE CLOUD by dragging it from a folder on the desktop and dropping it into the Results list in the CAPTURE CLOUD Browser. When a file is dropped into this list, you will be prompted to specify a Name and Description, as shown in Figure 2, above. Logging Chart Recorder data to CAPTURE CLOUD When the Chart Recorder is monitoring the status of a RAD7 in real time, CAPTURE can be configured to continuously log the RAD7 data to a file on disk, or to CAPTURE CLOUD. For more information please refer to the instructions in the Logging Chart Recorder Data section. Replacing existing CAPTURE CLOUD data If you attempt to upload RAD7 data but another data set from the same device with an equal or broader date range already exists on the CAPTURE CLOUD server, a message will appear asking if you would like to replace the existing data, as shown in Figure 4, below. Replacing existing data will irrevocably overwrite its contents.
Saving combined data to CAPTURE CLOUD It is possible to upload a combined data file containing radon data from more than one RAD7 device, as long as the user belongs to the organization(s) that own the associated RAD7s. Once the combined data has been saved to CAPTURE CLOUD, it will be listed in the CAPTURE CLOUD Browser under the heading of the RAD7 with the lowest of the various serial numbers represented in the combined data. For example, if a radon data file contains data from RAD7s 5000, 5001, and 5002, it will appear in the Browser as if it belongs to RAD7 5000. (For more information on combining data files, see the Combine RAD7 Data section.) |
|
|
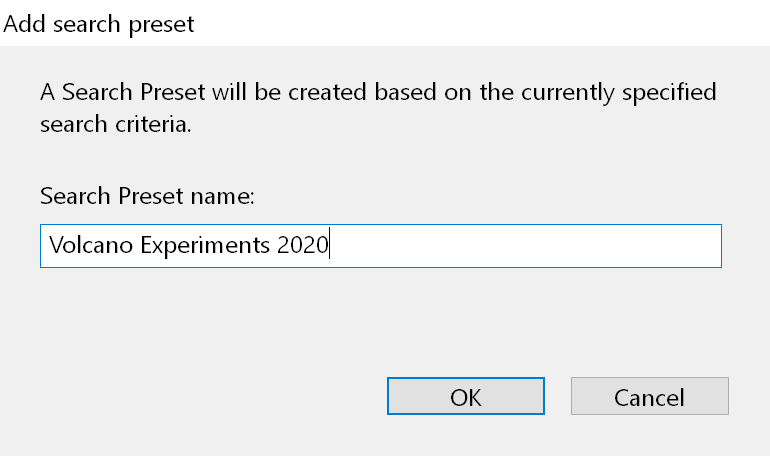
Creating Search Presets Specific combinations of search parameters can be saved as Search Presets for later reuse. To create a Search Preset, first enter the desired search criteria in the CAPTURE CLOUD Browser; this may include an Owner, Organization, Device, Date Range, Name, Description, and/or specific Data Tags. Next go to the Search Preset pop-up menu near the top left corner of the CAPTURE CLOUD Browser, and choose "Add Search Preset..." You will be prompted to enter a name for the new Search Preset, as shown in Figure 6, below. After clicking OK, the new preset will be included in the Search Preset pop-up menu. This search preset will remain available unless or until it is deleted.
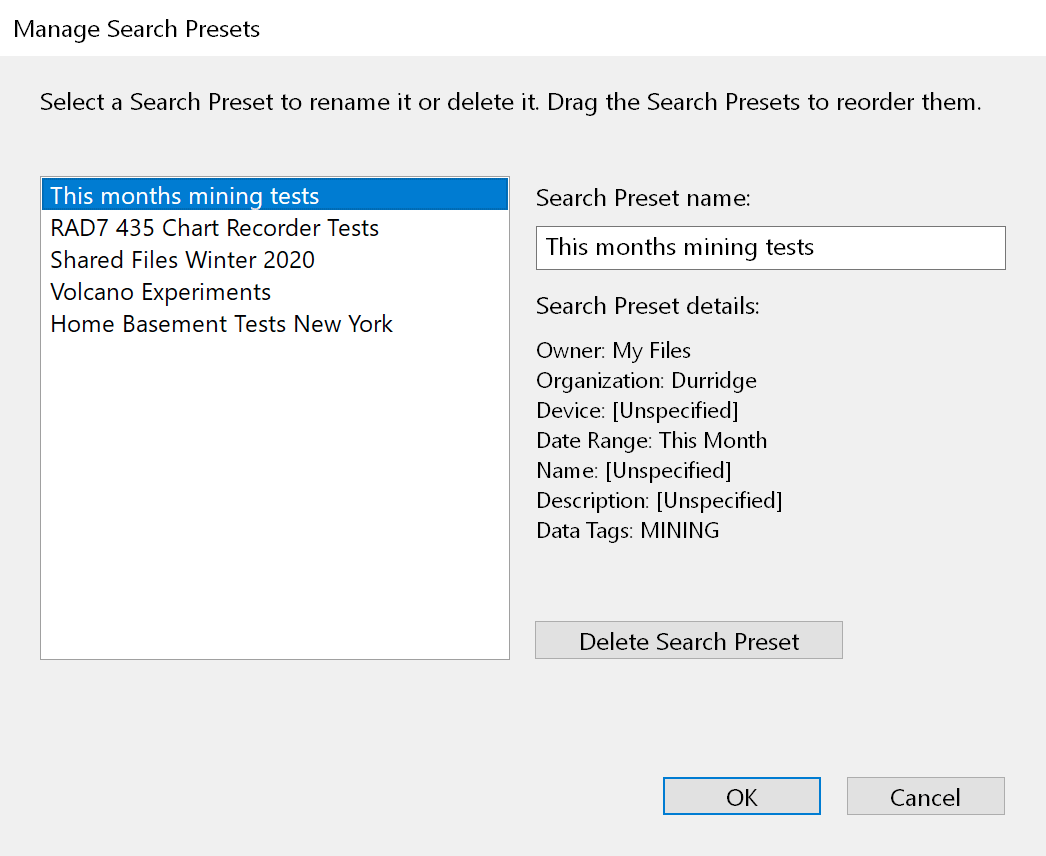
Managing Search Presets To rename or delete an existing Search Preset, go to the Search Presets pop-up menu near the top left corner of the CAPTURE CLOUD Browser, and choose "Manage Search Presets..." The Manage Search Presets Window will appear as shown in Figure 7, below. Select a Search Preset from the list at the left side of the window to view the specific search criteria contained in the preset, and enter a new name or click the Delete Search Preset button, as desired. Note that two separate Search Presets may not share the same name. When finished, click OK to return to the CAPTURE CLOUD Browser. The contents of the Search Presets menu will reflect any changes that have been made.
|
|