TOOLS MENU FUNCTIONALITY


The Tools menu in the menu bar contains commands for conducting various calculations, manipulating RAD7 Data files, and installing and disabling the RAD7's RADLINK communications software. These features are explained in this section.


Event-Driven Actions

The Event-Driven Actions command in the Tools menu is used to configure CAPTURE to respond in a variety of ways to specified occurrences. For example, when a RAD7 reports a high radon concentration, CAPTURE can sound an alarm or send an email. For more information, see the Event-Driven Actions section.


Concentration Unit Converter

The Concentration Unit Converter command in the Tools menu is used to convert a user-supplied radon concentration value between four different concentration units: Bq/L, Bq/m3, Dpm/L, and pCi/L. Enter a concentration value and specify a unit, and the converted values will be displayed as shown in Figure 1, below.


Figure 1: Concentration Unit Converter Window

Sensitivity Unit Converter

The Sensitivity Unit Converter command in the Tools menu is used to convert a user-supplied RAD7 sensitivity value between four different sensitivity units: cpm/(Bq/L), cpm/(Bq/m3), cpm/(Dpm/L), and cpm/(pCi/L). Enter a sensitivity value and specify a unit, and the converted values will be displayed as shown in Figure 2, below.


Figure 2: Sensitivity Unit Converter Window

Humidity Correction Calculator

The RAD7 is liable to under-report the radon concentration in high humidity conditions. The Humidity Correction Calculator command in the Tools menu is used to correct a radon concentration with respect to known temperature and humidity values. When a radon concentration, temperature, and relative humidity are specified, the corrected radon concentration will be calculated as shown in Figure 3, below. Note that humidity correction can also be applied to RAD7 graph data, as described in the Graph Controls Panel section.


Figure 3: Humidity Correction Calculator Window

Radon In Water Calculator

The Radon In Water Calculator command in the Tools menu is used to calculate a Radon In Water concentration based on a user-supplied Radon In Air value obtained using either the RAD AQUA, Water Probe, or RAD H2O. It is possible to calculate a Radon In Water concentration for a RAD H2O test that was conducted using the wrong protocol (for example Sniff protocol instead of WAT-250 protocol).

RAD AQUA and Water Probe calculations require specifying not only the Radon in Air concentration, but also the Water Temperature and Water Type. If the water type is set to Saline Water, it is necessary to specify the salinity in parts per thousand.

The calculated Radon In Water Concentration is displayed at the bottom of the window, along with the ratio of Radon in Air to Radon in Water, as shown in Figure 4, below.


Figure 4: RAD H2O Radon In Water Calculator Window

Combine RAD7 Data Files

To combine two or more RAD7 Data files into a single file, choose the Combine Data Files... command from the Tools menu. The Combine Data window will appear as shown below.

The Combine Data Window contains a list of RAD7 data files to be combined. RAD7 data files may be added or removed from the list using the Plus and Minus buttons. Files and folders may also be dragged directly into the list from the desktop. The Minimum permitted record separation combo box is used to specify the threshold under which records from different files will be merged and averaged into single records.

The Graph Combined Data and Save Combined Data to Disk checkboxes are used to specify whether the combined data will be graphed and saved, respectively. At least one of these options must be chosen, and at least two RAD7 data files must be added to the list in order for the combining process to proceed. If the combined RAD7 data is to be saved to disk, use the Select Location button to specify a name and location for the combined RAD7 data file.


Figure 5: Combine RAD7 Data Files dialog


Once the desired settings have been chosen, click Continue to complete the combining process. If there are any problems with the files being combined, the Errors Window will appear explaining the issue in detail. Only severe data formatting problems will prevent the combining process from being completed successfully. More information on data errors is available in the RAD7 Data Errors section.


Downsample RAD7 Data File

If a RAD7 is measuring a low concentration of radon and the instrument is configured to record cycles at frequent intervals, an insufficient number of radon detection events may occur during each cycle, and each data record may therefore have an excessively high uncertainty value, resulting in a "noisy" RAD7 record set whose data points are statistically meaningless. In many such cases a longer cycle time could have produced statistically meaningful data points.

By downsampling a RAD7 Data File, it is possible to retroactively achieve the benefits of longer cycle times at any time after the data has already been recorded. During a downsampling operation the raw count information from neighboring data points is averaged to synthesize a set of combined data points. The resulting data set will consist of fewer data points than the original file, and each of the new data points will have a comparatively longer live time, a greater number of total counts, and a lower uncertainty value.

To downsample a RAD7 Data file, choose the Downsample RAD7 Data File... command from the Tools menu. The Downsample RAD7 Data File Window will appear as shown below. This window contains a control for specifying the minimum permitted record separation; records separated by fewer than the specified number of minutes will be averaged. Checkboxes are provided for specifying whether to graph and/or save the downsampled data. If the data is to be saved to disk, it will be necessary to specify the name and location of the downsampled data file.


Figure 6: Downsample RAD7 Data File dialog

Shift Dates In RAD7 Data File

The Shift Dates in RAD7 Data File command is used to modify the dates and times of the records in a RAD7 data file. This feature can be useful if it is discovered that a RAD7's clock settings were incorrect when data was recorded. The RAD7 record dates and times may be shifted either forwards or backwards, by a user-specified number of days, hours, and minutes. Once the specified time shift has been applied, a Save As dialog box appears, allowing the modified RAD7 data file to be saved under a new name.


Figure 7: Shift Dates In RAD7 Data File Window

Shift Dates In Temperature Data File

The Shift Dates in Temperature Data File command is used to modify the dates and times of the records in a temperature data file. This feature can be useful if it is discovered that a temperature probe's clock settings were incorrect when data was recorded. The temperature record dates and times may be shifted either forwards or backwards, by a user-specified number of days, hours, and minutes. First it is necessary to identify the format of the temperature data in the selected file by selecting a Temperature Data Profile. Once the format has been chosen the desired time shift may be applied, and the modified data can be assigned a new format based on any of the built-in Temperature Data Profiles. The Save As dialog box allows the modified temperature data file to be resaved under a new name.


Figure 8: Shift Dates In Temperature Data File Window

RADLINK Operations

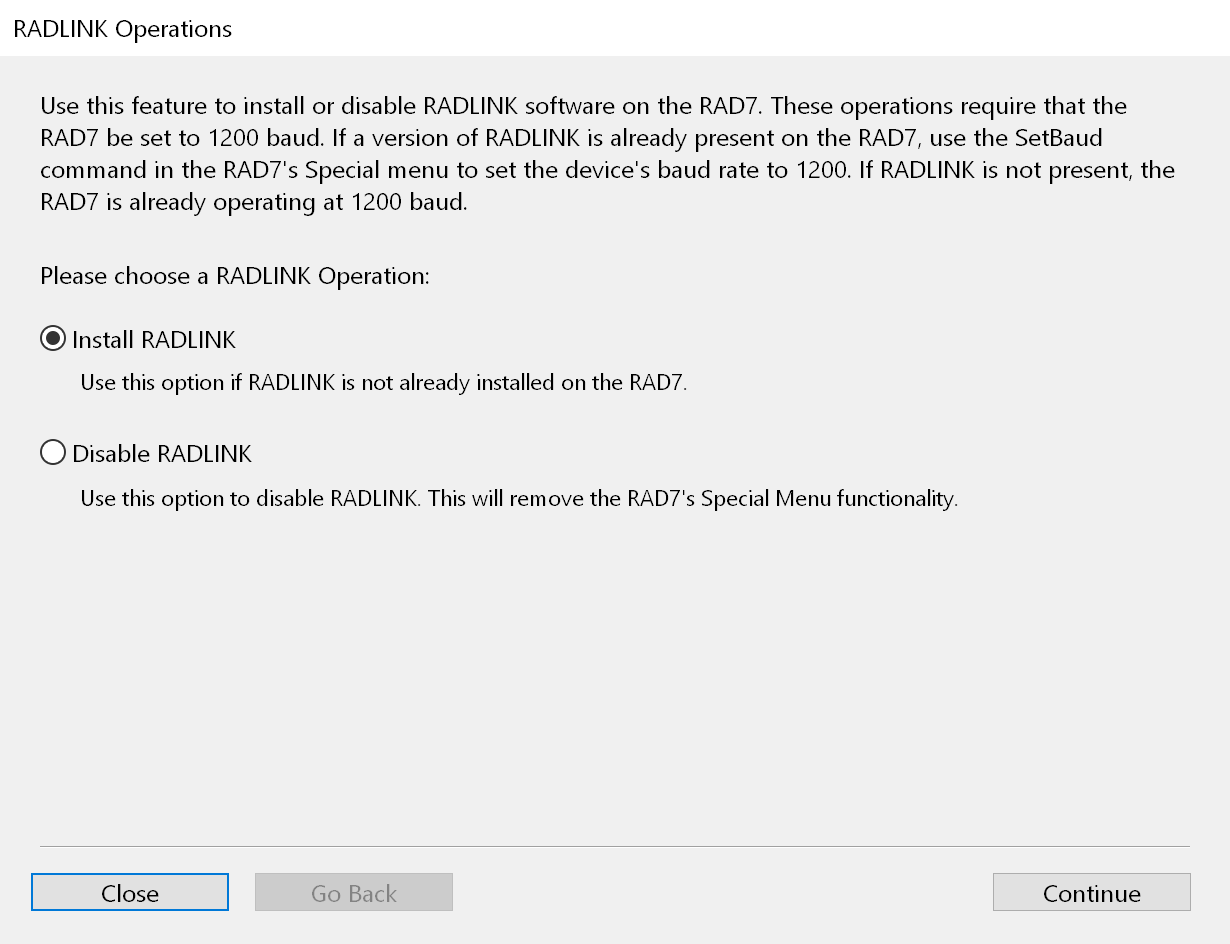
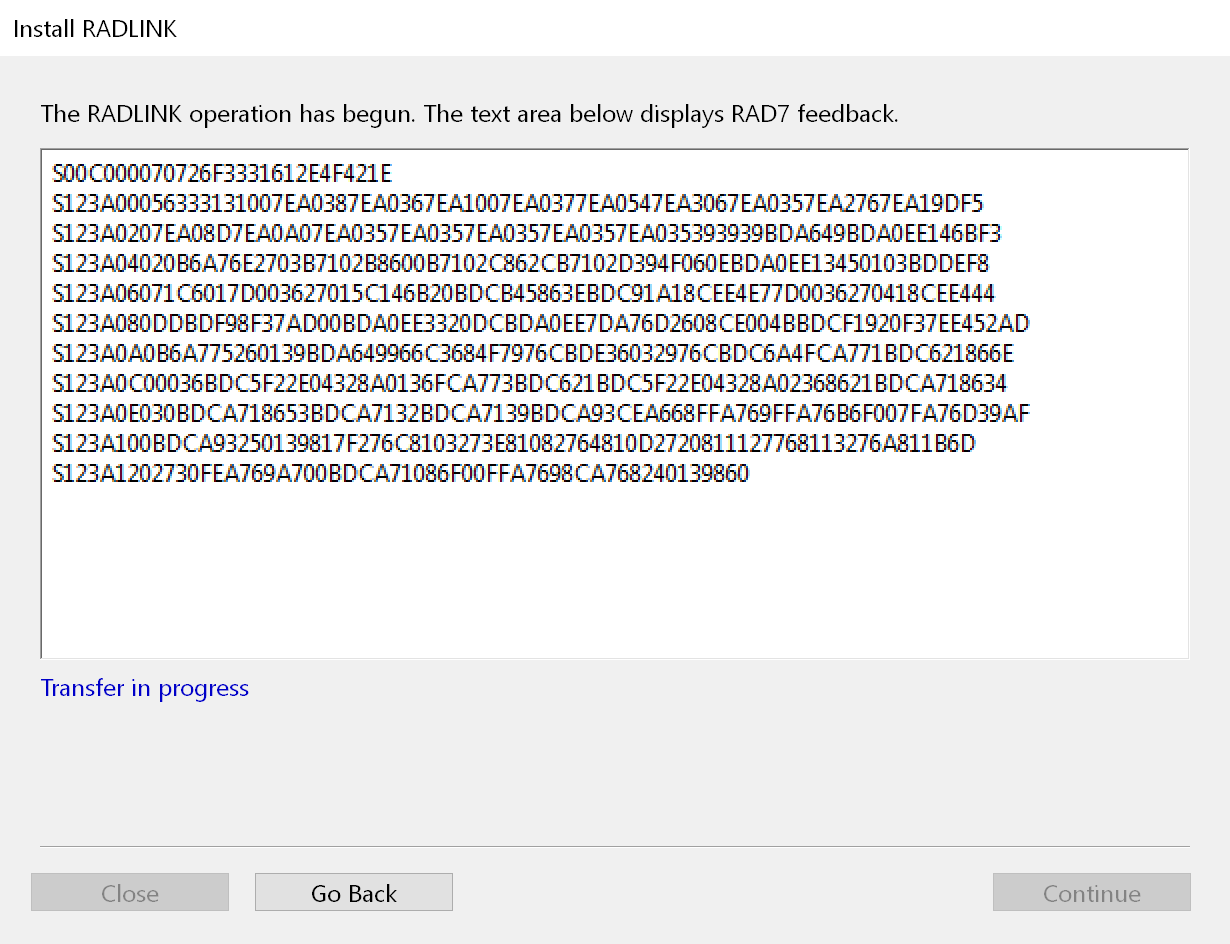
The RADLINK Operations command opens the RADLINK Operations Window, which is used to install and disable the RAD7's communications software, known as RADLINK. This command is useful if a RAD7's RADLINK software is lost or if it needs to be updated to a newer version. RADLINK enables two-way communication between the RAD7 and a computer, and the latest version of RADLINK is required for full communications functionality. The latest RADLINK update is recommended for all users.

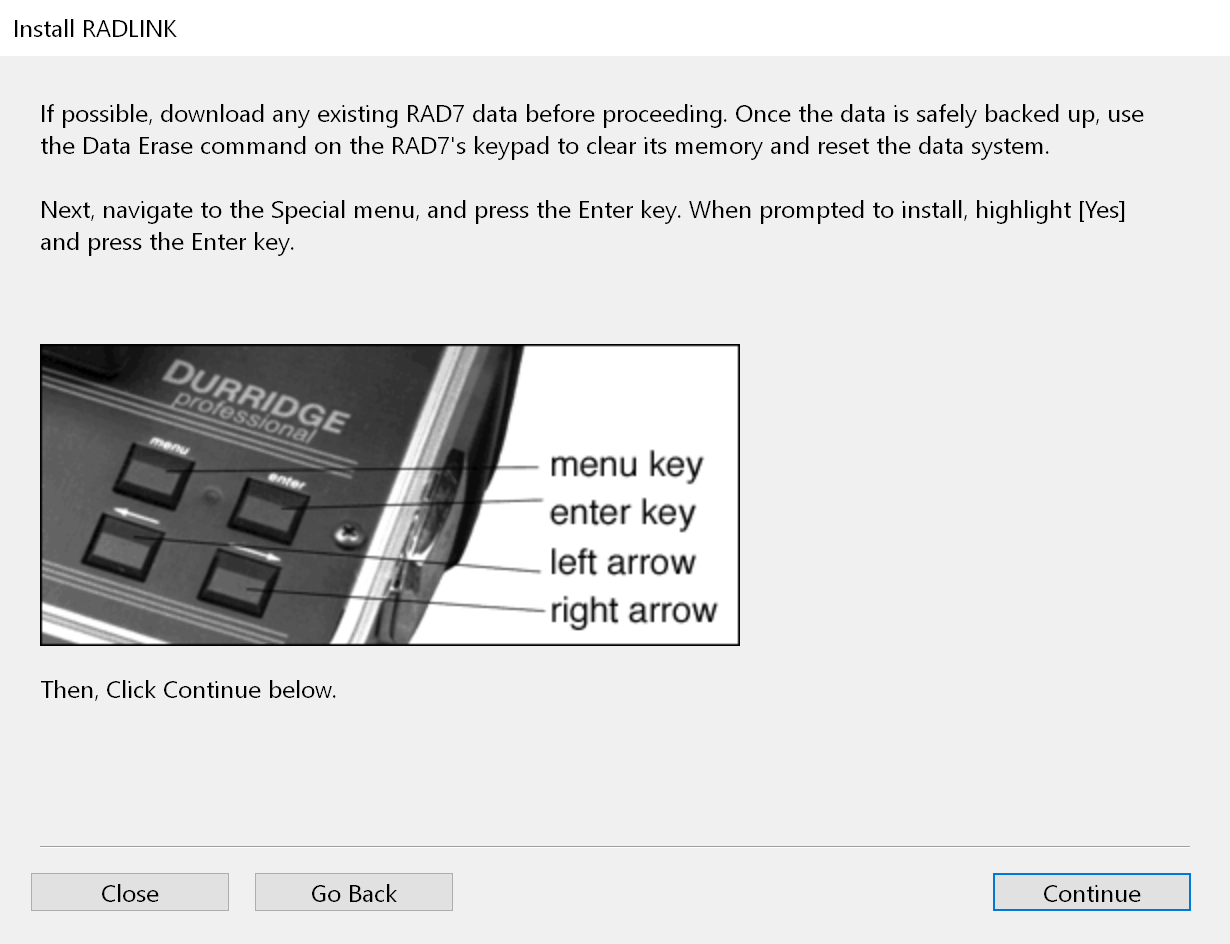
Before installing or removing RADLINK, it is recommended that any radon test data present on the RAD7 be downloaded and saved to the computer. Under normal circumstances RADLINK installation and removal operations do not erase the RAD7's radon test data, but nevertheless caution is advised .

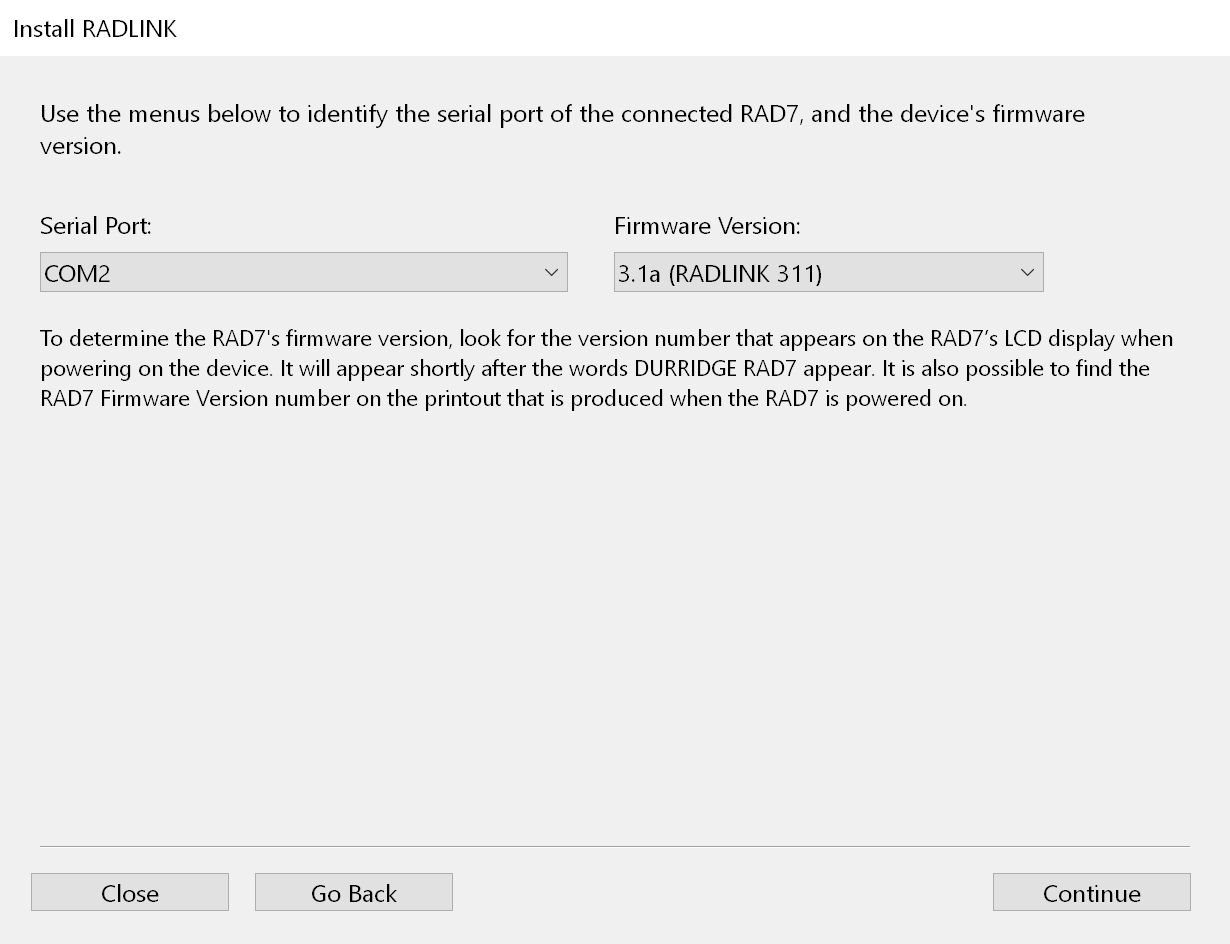
RADLINK installation and removal operations require that the RAD7 be set to 1200 baud. If a version of RADLINK is already present on the RAD7, use the SetBaud command in the RAD7's Special menu to set the device's baud rate to 1200. If RADLINK is not present on the RAD7 this step is unnecessary, because the device will have already reverted to 1200 baud.

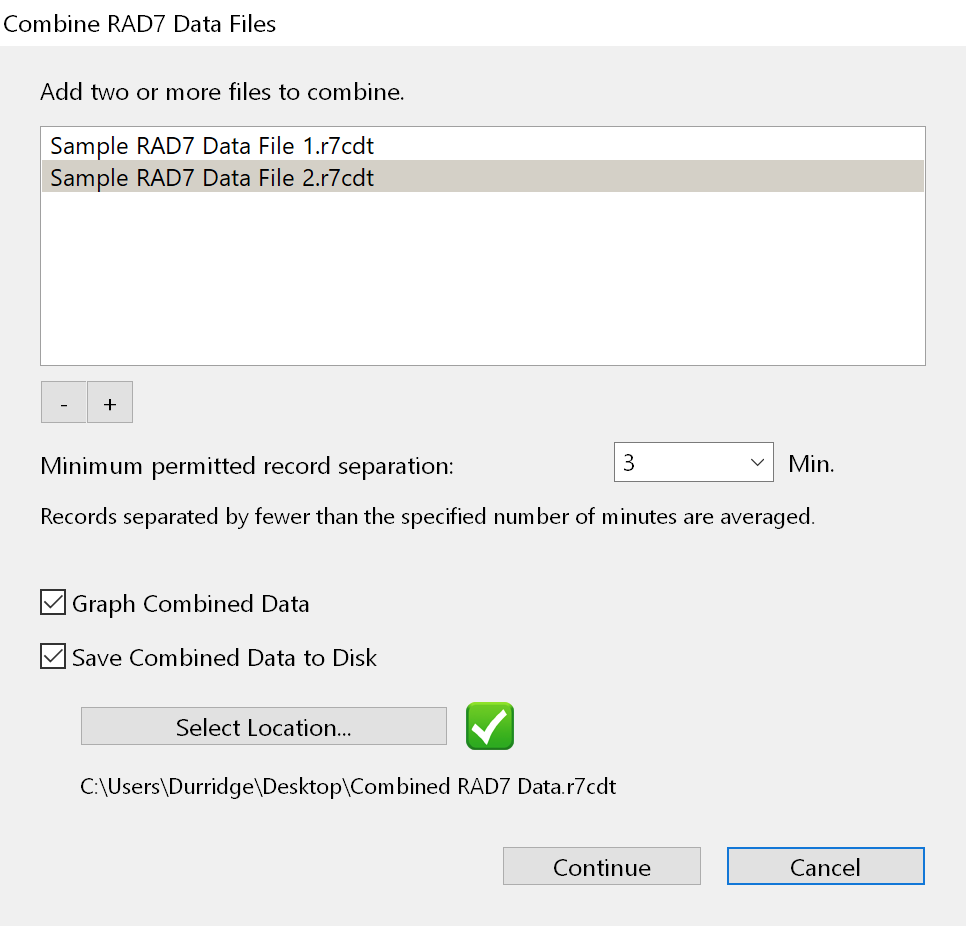
From the RADLINK Operations Window, choose Install RADLINK or Disable RADLINK as shown in Figure 9, below. If you wish to update RADLINK to a newer version, it is strongly advised to first disable the existing version. Use the radio buttons to specify whether to install or disable RADLINK, then click the Continue button.
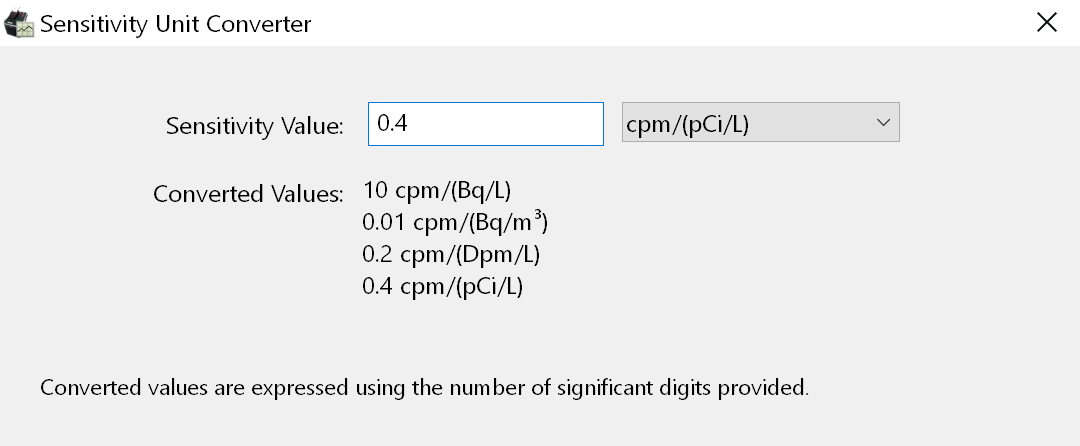
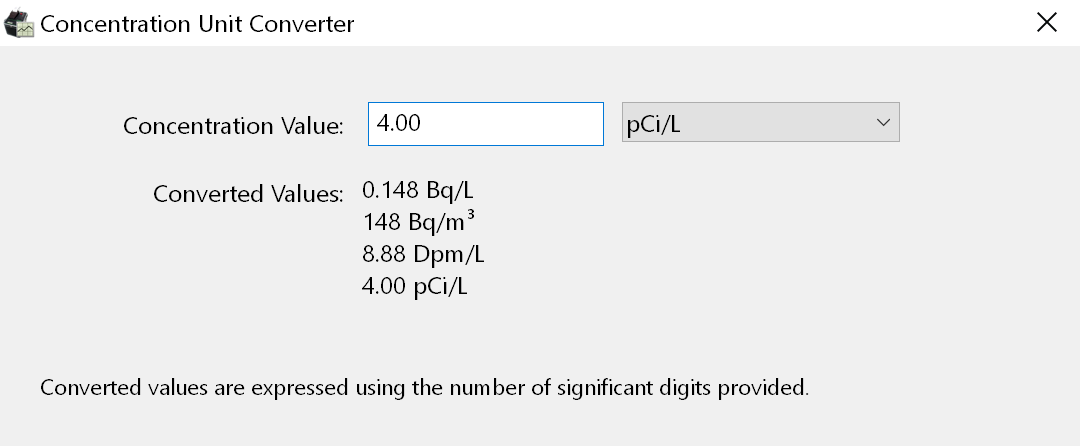


Figure 9: RADLINK Operations Window


If RADLINK is to be installed, specify the serial port of the connected RAD7 and its firmware version using the pop-up menus as shown in Figure 10, below. If RADLINK is to be disabled, it is necessary to specify only the serial port.

If you are unsure which serial port the RAD7 is connected to and there are multiple available options in the Serial Port pop-up menu, try unplugging the RAD7's USB data cable from the computer and then closing and reopening the RADLINK Operations Window and observing which option is no longer made available in the Serial Port menu.

When installing RADLINK, CAPTURE will determine which version of RADLINK to install based on the specified firmware version. The RAD7's firmware version can be determined by observing its LCD display immediately after powering on the device. If the firmware version specified in the RADLINK Operations Window does not match the version present on the RAD7, the wrong version of RADLINK will be transferred and the installation procedure will have to be repeated.


Figure 10: RADLINK Installation Serial Port and Firmware Version setup


After clicking Continue, a set of instructions will appear as shown in Figure 11, below. These instructions will remind the user to download any existing radon test data from the RAD7 before proceeding, in order to protect against unintentional data loss when installing or disabling RADLINK.

If RADLINK is being installed, use the device's keypad to navigate to the Special menu, and press the Enter key. You will be prompted to install RADLINK. Highlight [Yes] and press the RAD7's Enter key again. If RADLINK is being disabled, navigate to the Special menu, press Enter, and press the right arrow button several times to select S-Load. Then press Enter again. The RAD7 will begin to await incoming RADLINK data.


Figure 11: Preparing to initiate a RADLINK Installation


Click Continue to begin the RADLINK installation or disabling procedure. Installing RADLINK takes a few minutes, and disabling RADLINK takes just a few seconds. The process can be monitored in the RADLINK Operation Window as shown in Figure 12, below.


Figure 12: RADLINK Installation in progress


When the RADLINK installation or disabling process has finished, you may close the RADLINK Operations Window. CAPTURE will then scan for RAD7s and it will detect any containing RADLINK. CAPTURE will offer to increase the speed of any newly discovered RADLINK-enabled RAD7 from 1200 baud to 9600 baud, making communication operations considerably faster.


Terminal Window

The Terminal Window command in the Tools menu provides an interface for manually issuing serial commands to any device that communicates using a standard serial protocol, including RAD7s and DRYSTIKs. The Terminal Window is shown in Figure 13, below.

Use the Serial Port and Baud Rate pop-up menus to specify terminal connection settings, and then click Connect to begin. Enter a command using the command line at the bottom of the Terminal Window, and then click the Send button to issue the command. When a response is received it will be added to the large text area at the center of the window. When communicating with a RAD7 or other device via the Terminal Window, other CAPTURE features that involve device communication, such as the Chart Recorder, will be temporarily unavailable.


Figure 13: Terminal Window