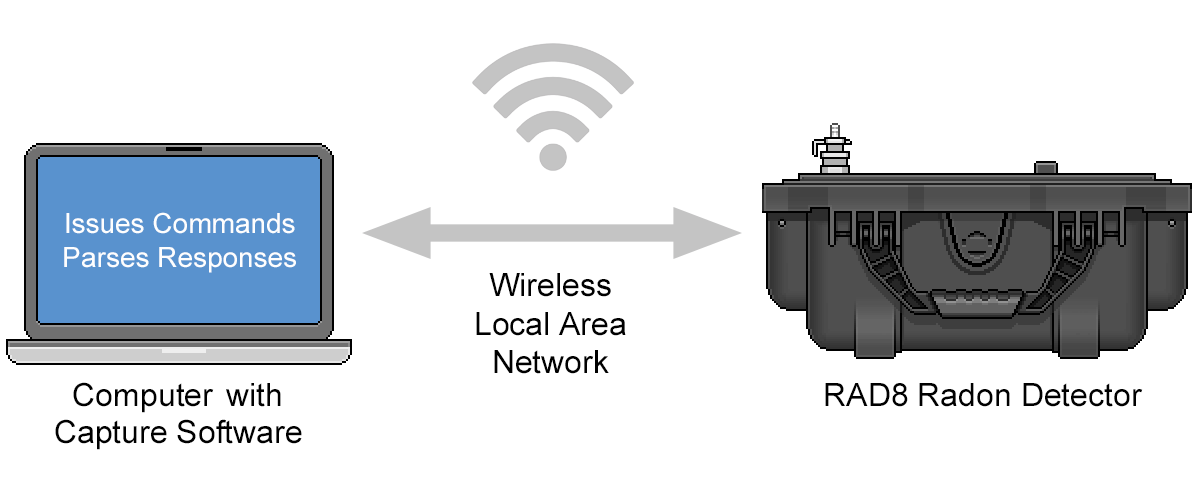
Figure 1: Using Capture software to connect to a RAD8 over a wireless local area network.
NETWORK AND REMOTE CONNECTIVITY |
|
When a Durridge instrument is operating in a dangerous or inaccessible location, or any location more than a few feet away from a computer, it may be desirable to connect to it remotely. Depending on the situation, this may be achieved via a Wi-Fi connection, a wired a local area network connection, an internet connection, or Bluetooth. This section explains how to configure Capture for these types of connections. The RAD8, RAD7, and DRYSTIK can be accessed over a network, and the RAD7 can additionally be accessed over Bluetooth, using an optional adaptor accessory. Once Capture has established a connection with a remote instrument, standard operations such as downloading data and device monitoring can proceed as they would normally. Each remote communication method is described below. |
|
|
Next launch Capture on the computer, and click the Add Device button on the Main Window Toolbar. Choose Add RAD8, and set the Connection Type to Network, as snown in Figure 2, below. In the accompanying IP Address field, enter the address stated on the RAD8 screen. The Interface menu should be set to RAD8 Built-In Wi-Fi. Click the Connect button. Once connected to the RAD8, Capture will allow you to Download RAD8 data and monitor and control the instrument via the Chart Recorder. |
|
| RAD8 Wired Network Connections |
The RAD8 does not contain a built-in ethernet port for wired network connections, however it is possible to connect a RAD8 to a wired local area network through the use of an optional access point accessory. This is in effect a mini wireless router that is physically connected to the wired network, and communicates with the RAD8 wirelessly. For more information, plese see the RAD8 Wired Network Connection article on the Durridge website. |
| Server-Assisted Connections |
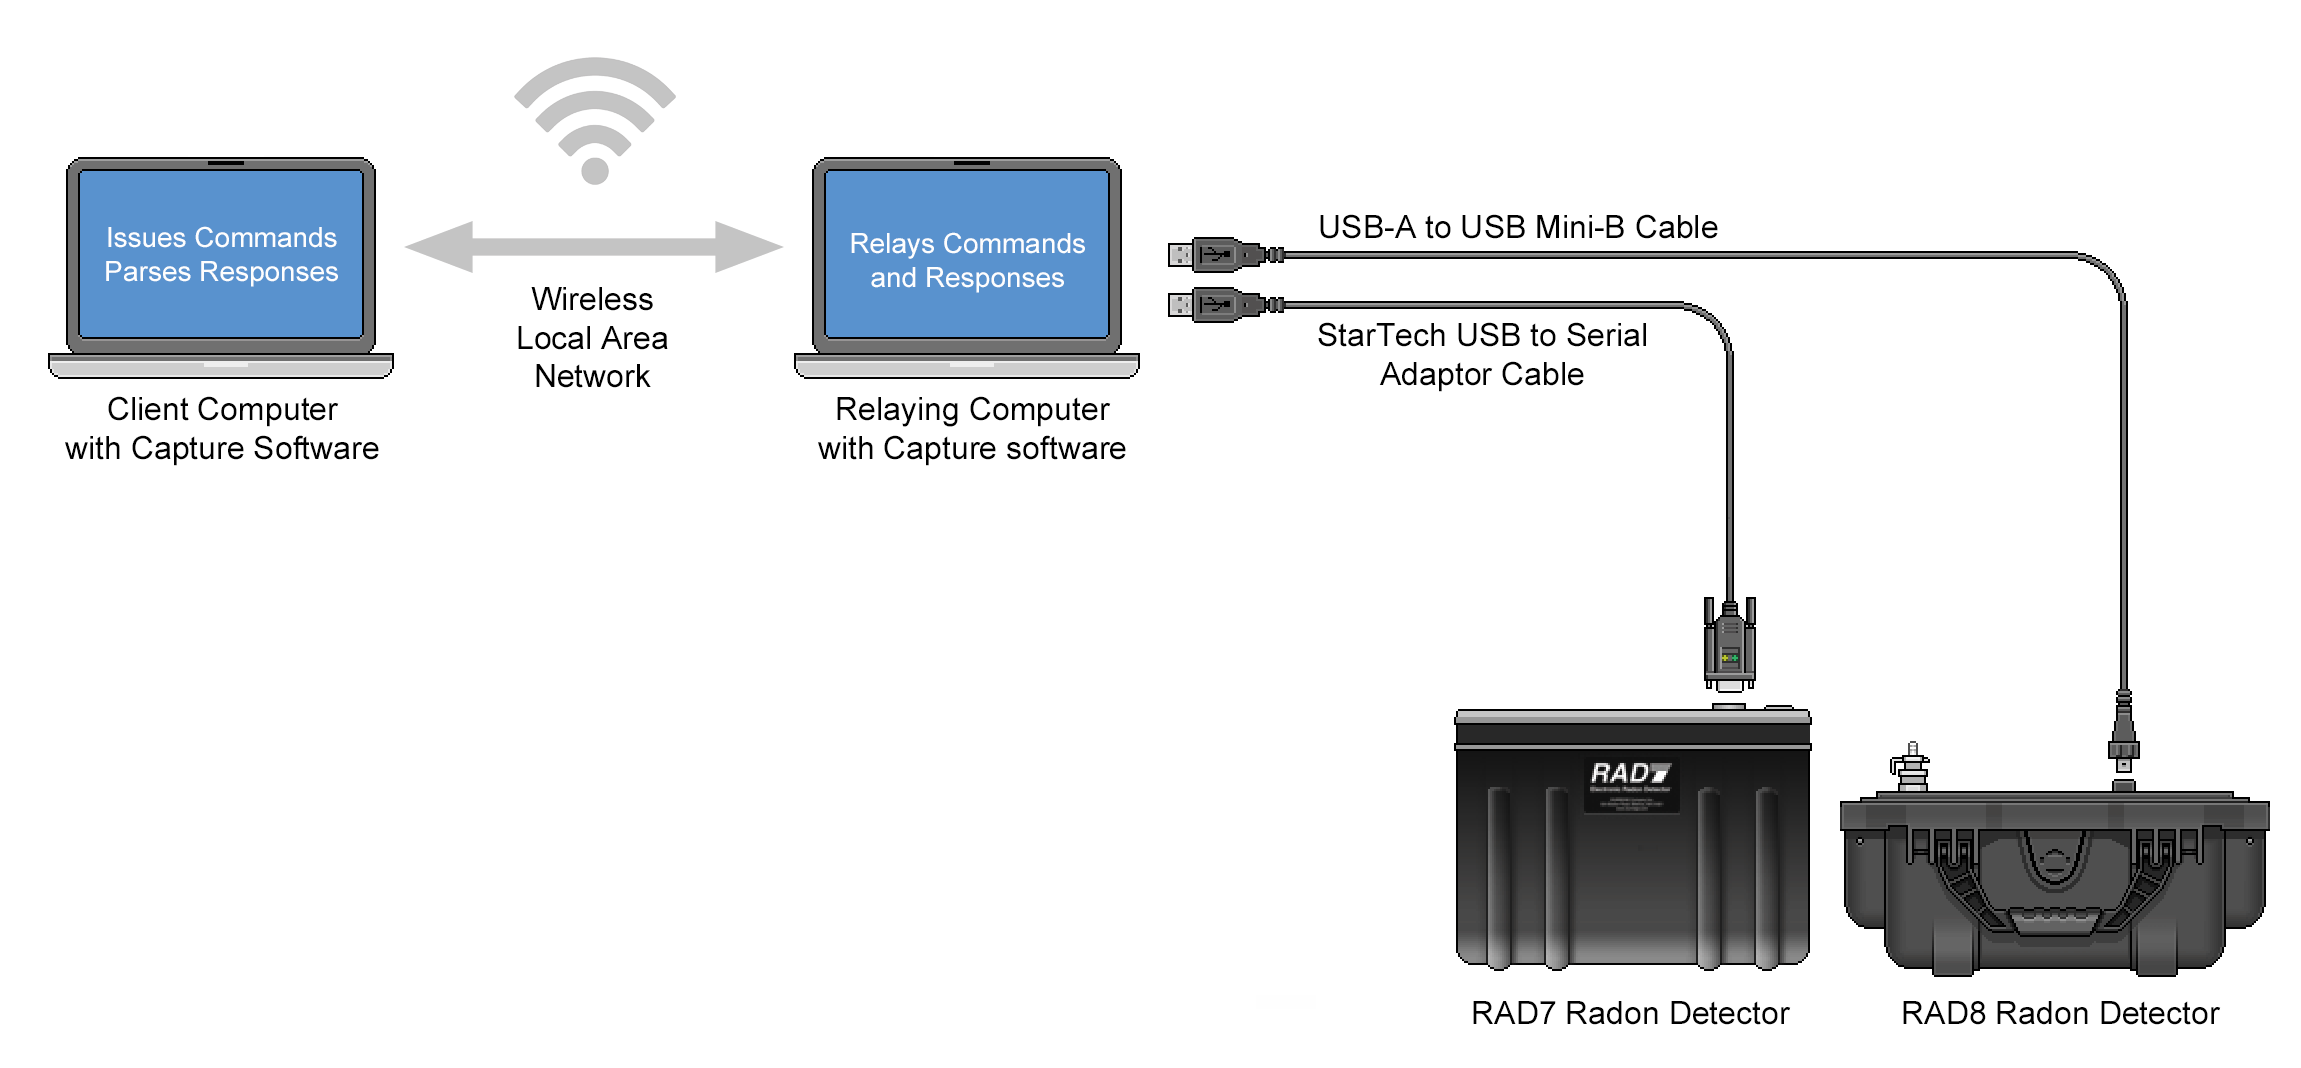
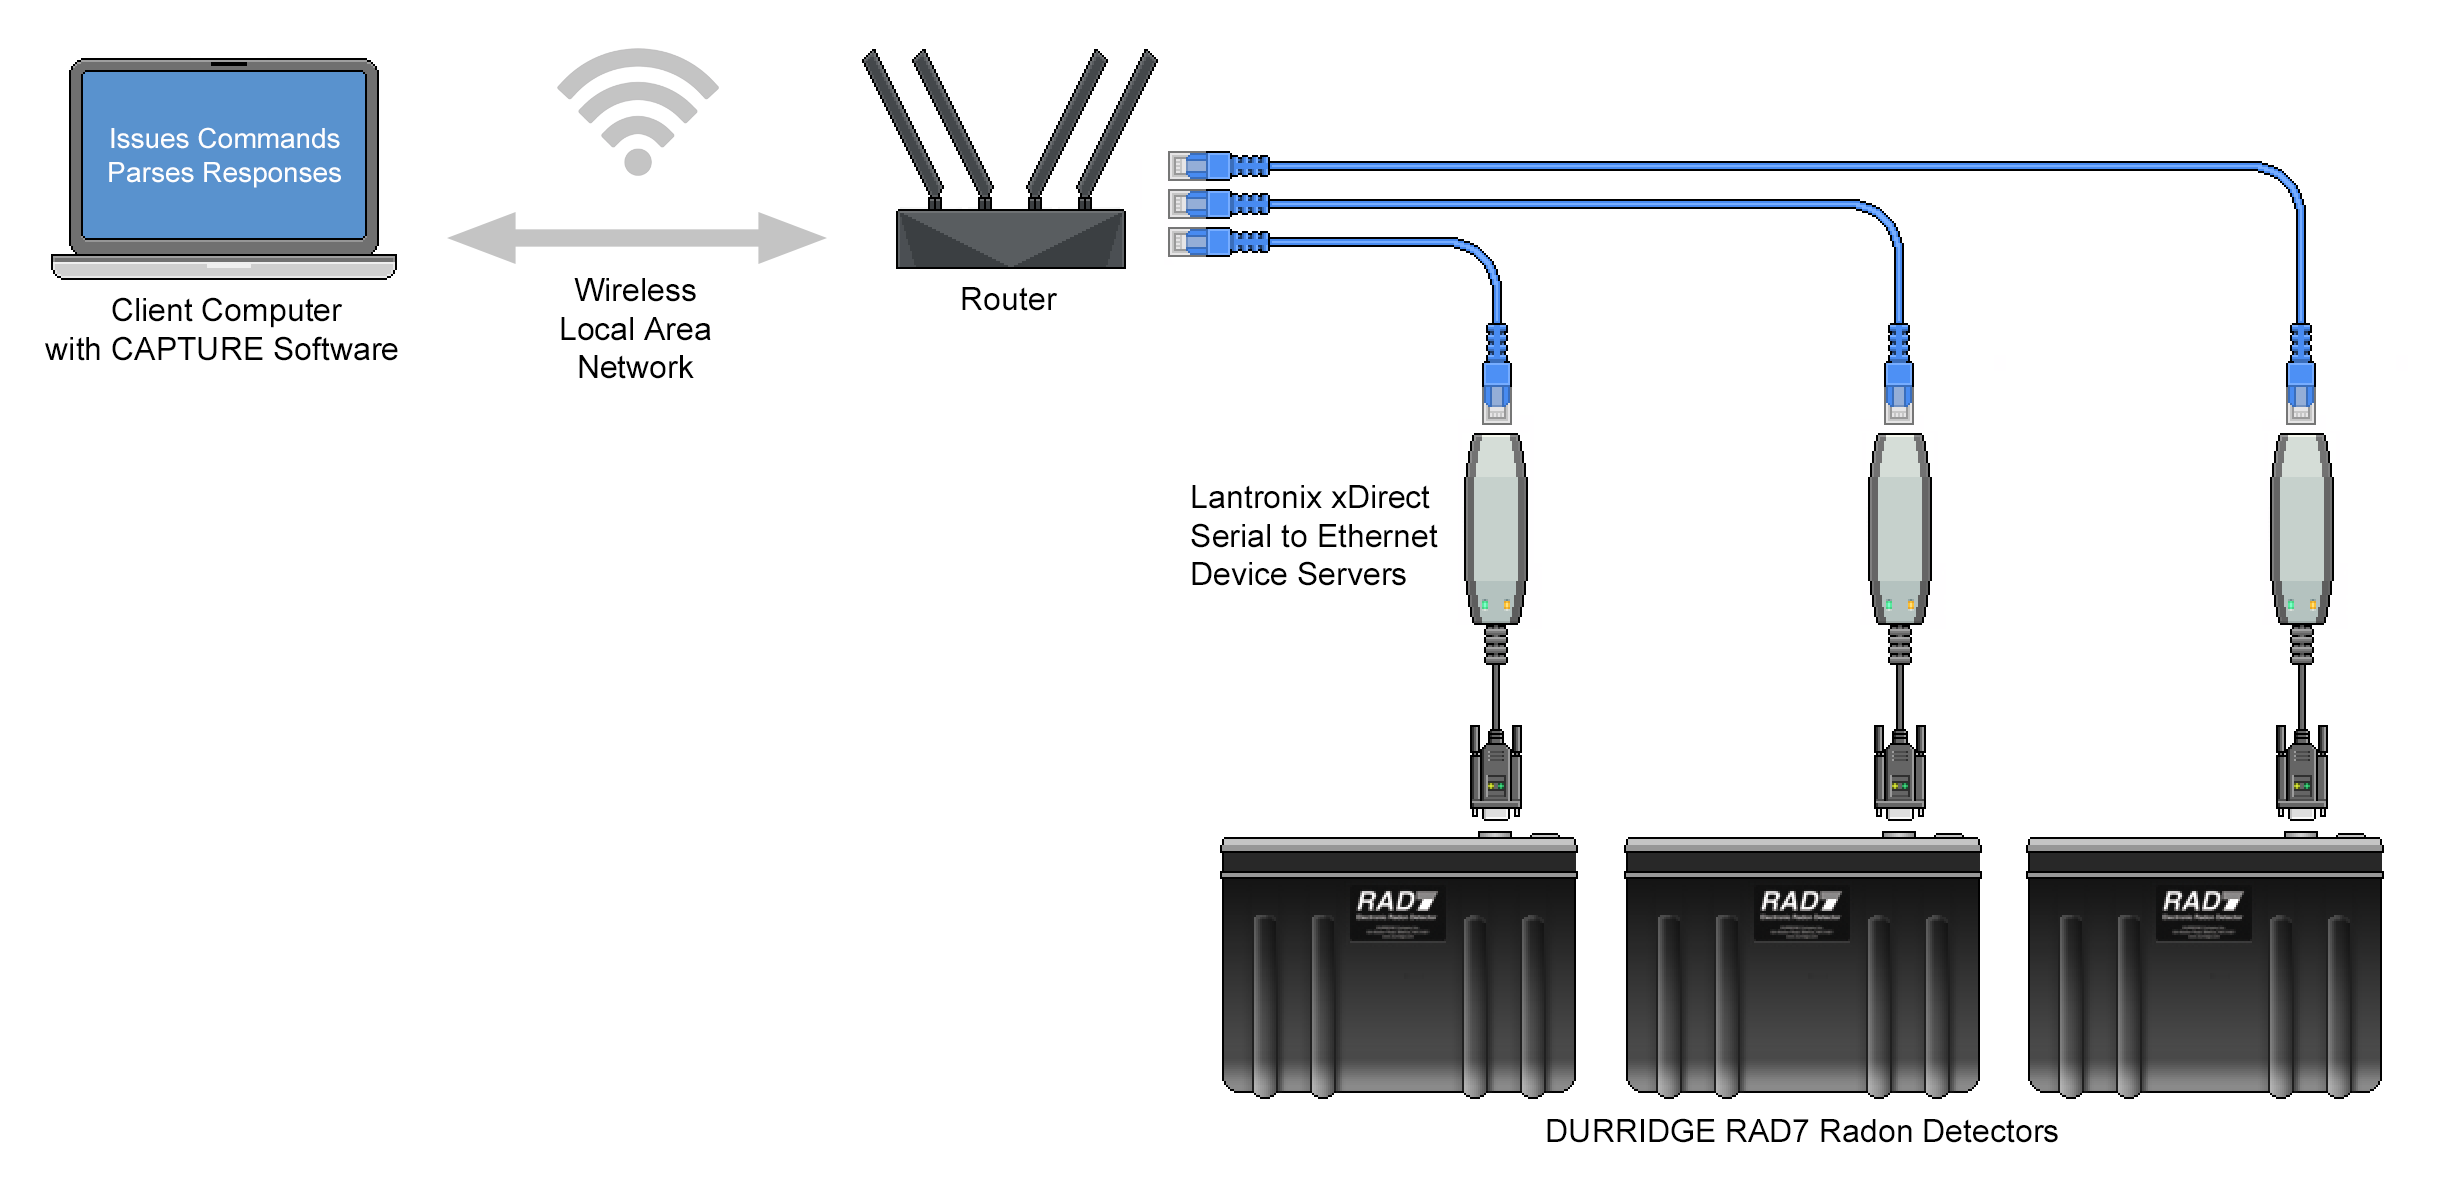
Capture can communicate with RAD8s, RAD7s, and DRYSTIKs that have been connected to a server on a local area network. The "server" may be another computer running Capture, or in the case of the RAD7 it may be a serial-to-ethernet device server such as a Lantronix xDirect, or a serial-to-Wi-Fi device gateway such as the Lantronix SGX 5150. In either case the server to which the Durridge instrument is connected receives commands sent from a computer running Capture, and then immediately relays those commands to the instrument. When the instrument issues a response, the server relays the response back to Capture. Note: most of the information below about the Lantronix xDirect also applies to the Lantronix SGX 5150, however the SGX 5150 uses a different kind of cable to connect to the RAD7, and it does not need to be directly plugged into a router. Network-based connections are easier to set up if all of the required equipment exists within the same local area network, and there is no security equipment impeding communication between devices. Communicating with a RAD8, RAD7, or DRYSTIK across the internet is slightly more complicated; this is discussed in the Internet Communications section below. Figures 3 and 4, below, show how to connect RAD8s and RAD7s to networking hardware. Figure 3 shows a RAD8 and RAD7 connecting via a relaying computer. Figure 4 shows a connection involving RAD7s with Lantronix xDirect devices. Note that a relaying computer can facilitate RAD8, RAD7, and DRYSTIK connections, whereas a Lantronix xDirect can facilitate only RAD7 connections. Multiple Durridge instruments can be connected to a single relaying computer, as shown in Figure 3, whereas only one RAD7 can be connected to each Lantronix xDirect device. |
|
|
To establish a connection to a RAD8, RAD7, or DRYSTIK on a local network, first launch Capture on the client computer (which is the computer to which the Durridge instrument is not directly attached). If the server is a relaying computer, launch Capture on the server as well, and in the Main Window enter the Relay RAD8 Commands, Relay RAD7 Commands, or Relay DRYSTIK Commands panel, as shown in Figure 5. Click the Listen button to prepare to receive commands from the client. This will allow any commands received by the server to be passed on to the RAD8, RAD7, or DRYSTIK. When Capture begins listening for incoming commands, the Listen button will change to Stop. |
|
|
If the server is a Lantronix device, no configuration is required for it to operate on a local area network, but it is nevertheless advisable to review the instructions provided by the device manufacturer to establish familiarity with the product. On the client computer, go to Capture's Main Window and click the green Add Device button, and then select either Add RAD8, Add RAD7, or Add DRYSTIK from the menu. The Connection Panel will appear as shown in Figures 6 and 7, below. In the IP Address field, enter the local IP address of the server to which the Durridge instrument is directly connected. (This number is typically similar to the local IP address of the client computer, however the last few digits will differ.) The Port Selection menu should be set to Automatic if the server to which the instrument is connected is another computer running Capture. The Port Selection menu should be set to Manual if the server is a Lantronix device or similar. In the first case, enter the Serial Number of the RAD8, RAD7, or DRYSTIK. In the second case, enter the server's communication port number. If a Lantronix xDirect is being used, the port number is 10001 by default. Please refer to the manufacturer's documentation to determine the correct port number as necessary. |
|
|
After the server starts listening for incoming commands, click Connect on the client computer. Once the connection becomes active, operations may be performed in the same manner as if there was a direct serial connection between the client computer and the server to which the Durridge instrument is attached. To end a session, either click the Disconnect button on the client copy of Capture, or (if applicable) click Stop on the server copy of Capture to prevent it from relaying commands. |
| Internet Communications |
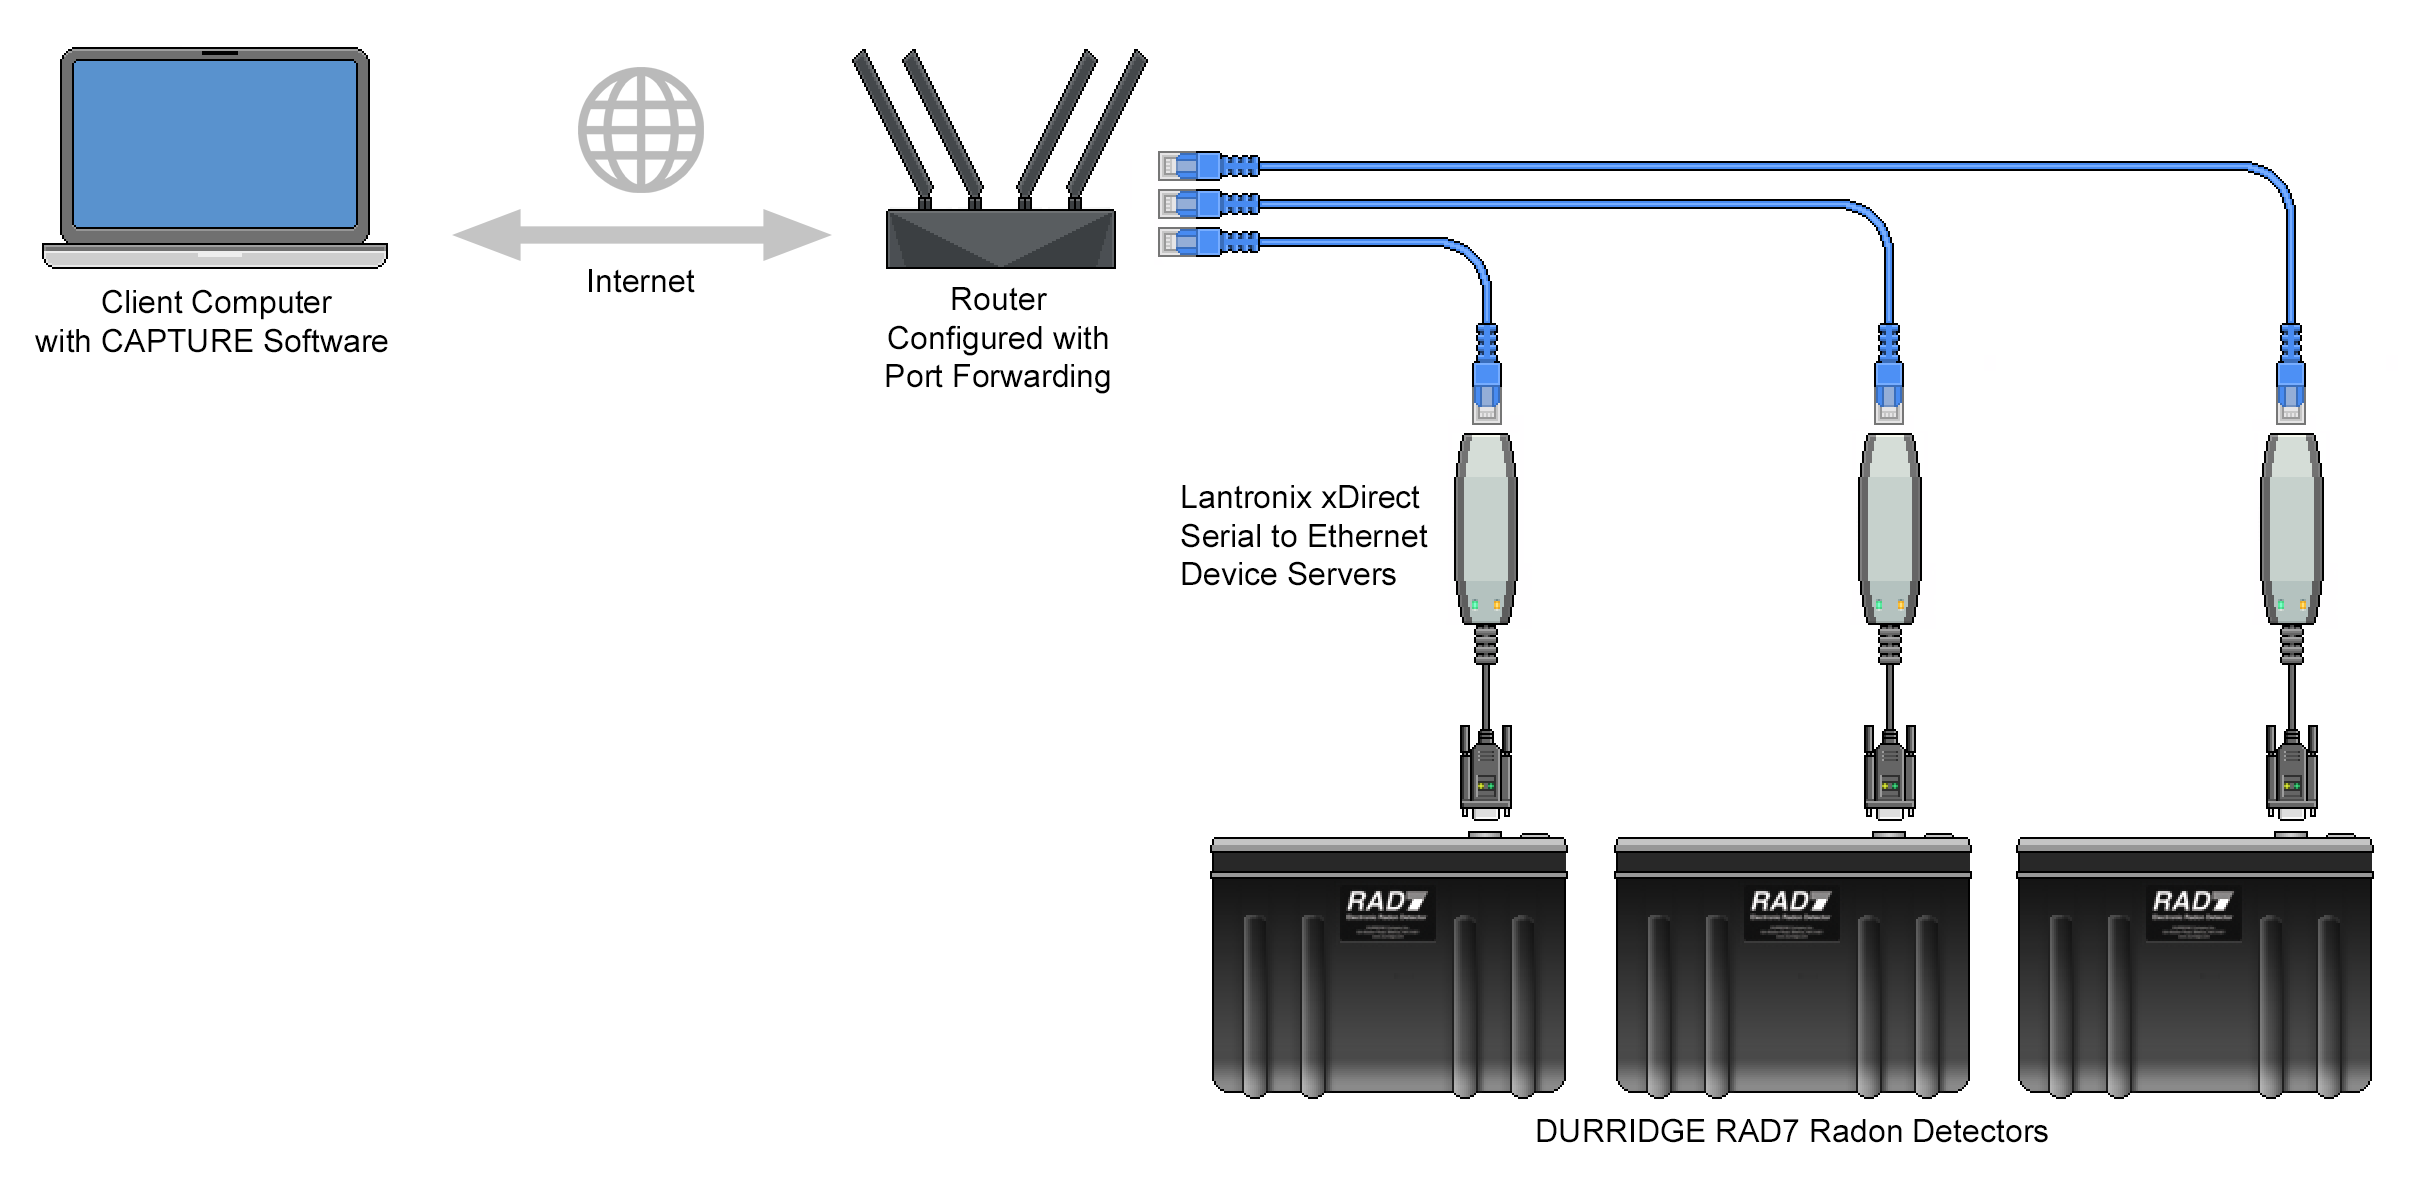
Communicating with a Durridge instrument across the internet is similar to communicating over a local area network. The main difference is that the router at the location of the instrument must be configured to forward a specific port to the local IP address of the server. (If the server is a Lantronix xDirect, the port number will typically be 10001.) Please consult your router manual for details on how to configure port forwarding. Once port forwarding has been set up, open Capture on the client computer, and in the Network connection panel (shown in Figure 7) enter the external (public) IPv4 address of the instrument's location in the IP Address field. (To determine a location's external IPv4 address, visit https://whatismyipaddress.com.) The Port Selection menu should be set to Manual, and the Port Number field should be set to the port number used by the server (10001 in the case of the Lantronix xDirect). Please refer to the Lantronix documentation to determine the correct port number as necessary. Note that if multiple RAD7s are connected to a router via multiple Lantronix xDirect devices, each Lantronix device must be configured to use a different port, and the router's port forwarding should be configured accordingly. |
|
| RAD7 Bluetooth Connections |
For short distance wireless connections between the RAD7 and a computer, the simplest solution is to attach a Serial to Bluetooth adapter to the RAD7's serial port. A Serial to Bluetooth adapter can create a virtual serial port on a nearby computer in much the same way as a serial to USB adapter cable. Therefore connecting to a Bluetooth-enabled RAD7 is as simple as clicking the Scan for RAD7s button in Capture's Main Window. Durridge offers the Parani SD1000 Serial to Bluetooth Adapter preconfigured for use with the RAD7, making the connection process very straightforward. This adapter has been tested across distances exceeding 40 meters, through walls and trees, and it is known to support 100 meter communication along uninterrupted lines of sight, particularly if the optional Extended Range 3 dBi Dipole Antenna is attached. Other Bluetooth adapters may be used as well, however any adapter not supplied by Durridge must be manually configured. This involves setting the adapter to operate at the RAD7's specific baud rate (typically 9600 baud). The adapter must also be configured as "discoverable", and any command response behavior must be disabled to avoid flooding the RAD7 with unwanted feedback. The procedure for completing this configuration will vary by adapter. Durridge provides detailed instructions on using the Parani SD1000 Serial to Bluetooth adapter with the RAD7. Please see the RAD7 Bluetooth Connectivity guide for details. |
|