DRYSTIK CONNECTIVITY |
|
|
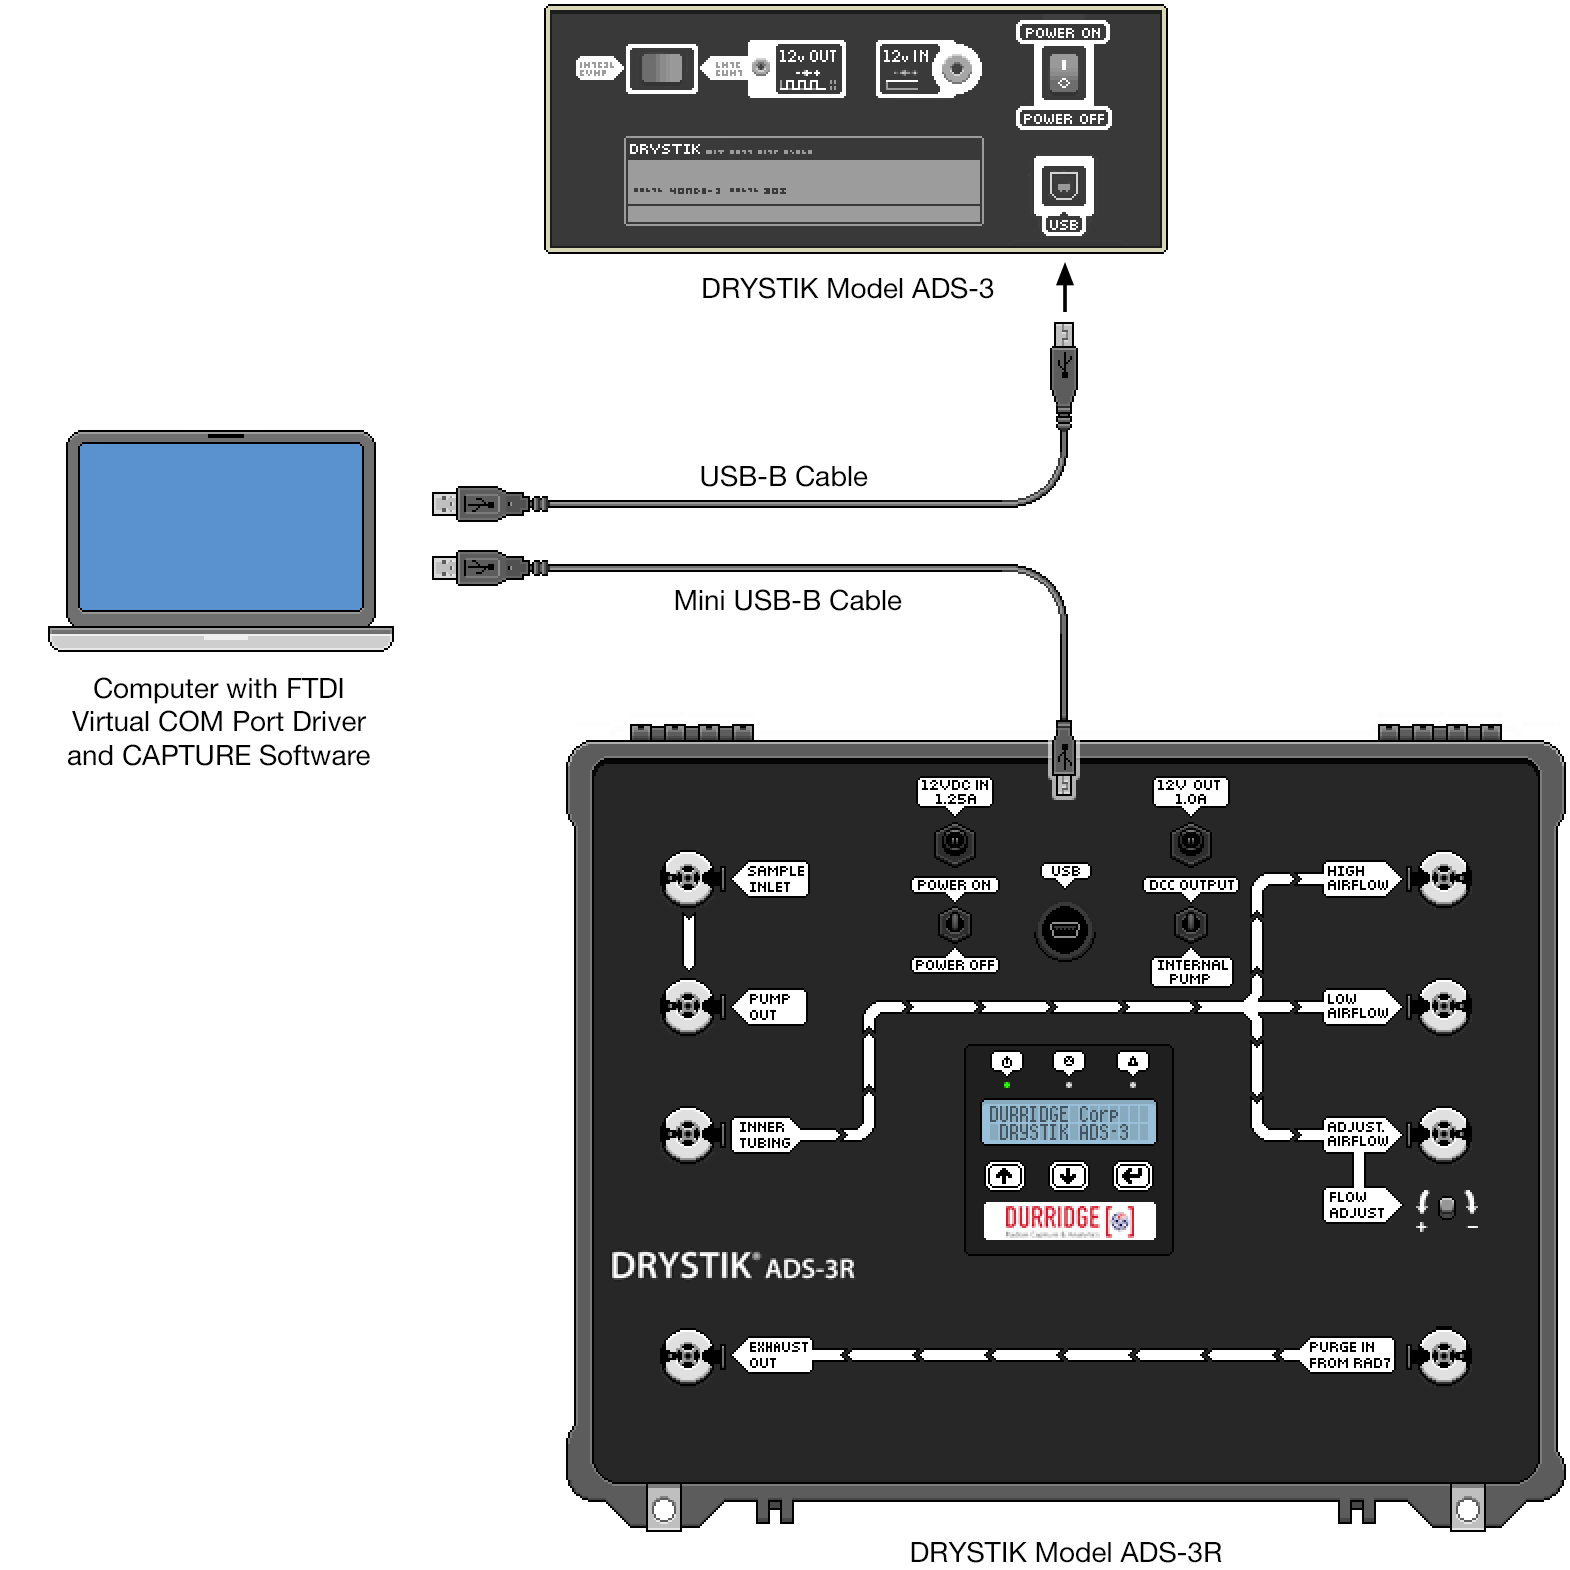
CAPTURE can connect not only to the RAD7, but also to the Durridge DRYSTIK active moisture exchanger. Compatible DRYSTIK models include the ADS-3 and ADS-3R, which connect to the computer via USB, with no serial adaptors required. A driver is required in order to communicate with the DRYSTIK; it is the same one used to connect to a RAD7 via the StarTech USB to Serial Adaptor. If necessary this driver can be downloaded from the Durridge website. Be sure to install the appropriate version of the driver based on your operating system. |
Once the appropriate driver has been installed, connect the DRYSTIK to the computer as shown in Figure 1, below. The DRYSTIK model ADS-3 uses a USB-B cable, while the DRYSTIK ADS-3R requires a Mini USB-B cable. Next connect the DRYSTIK's power supply and power the unit On. Finally, launch CAPTURE. As the program starts up it will automatically detect any connected DRYSTIK(s). An icon representing each DRYSTIK will appear in the row of toolbar items alongside any connected RAD7s. As with RAD7s, DRYSTIKs can be added, renamed, disconnected, and reconnected using the toolbar menu commands. Unlike RAD7s, DRYSTIKs always communicate with the computer at 9600 baud, so there is never any need to specify the connection speed when manually connecting to a DRYSTIK. |
|
When a DRYSTIK is connected to the computer and its icon is selected in CAPTURE's Main Window toolbar, the device's status will be displayed as shown in Figure 2, below. A black panel containing a set of green lights, which emulates the DRYSTIK's faceplate LEDs, indicating the device's power, pump, and alert state. Clicking the circular Refresh Arrows to the right of these status indicators updates the device status. The Refresh Arrows spin whenever communication is occurring between the computer and the DRYSTIK. Below the device status panel are several rows of text indicating the DRYSTIK's current state. This includes the pump current, the time left in the current period, the current duty cycle, the DRYSTIK's model and serial numbers, and more. |
|
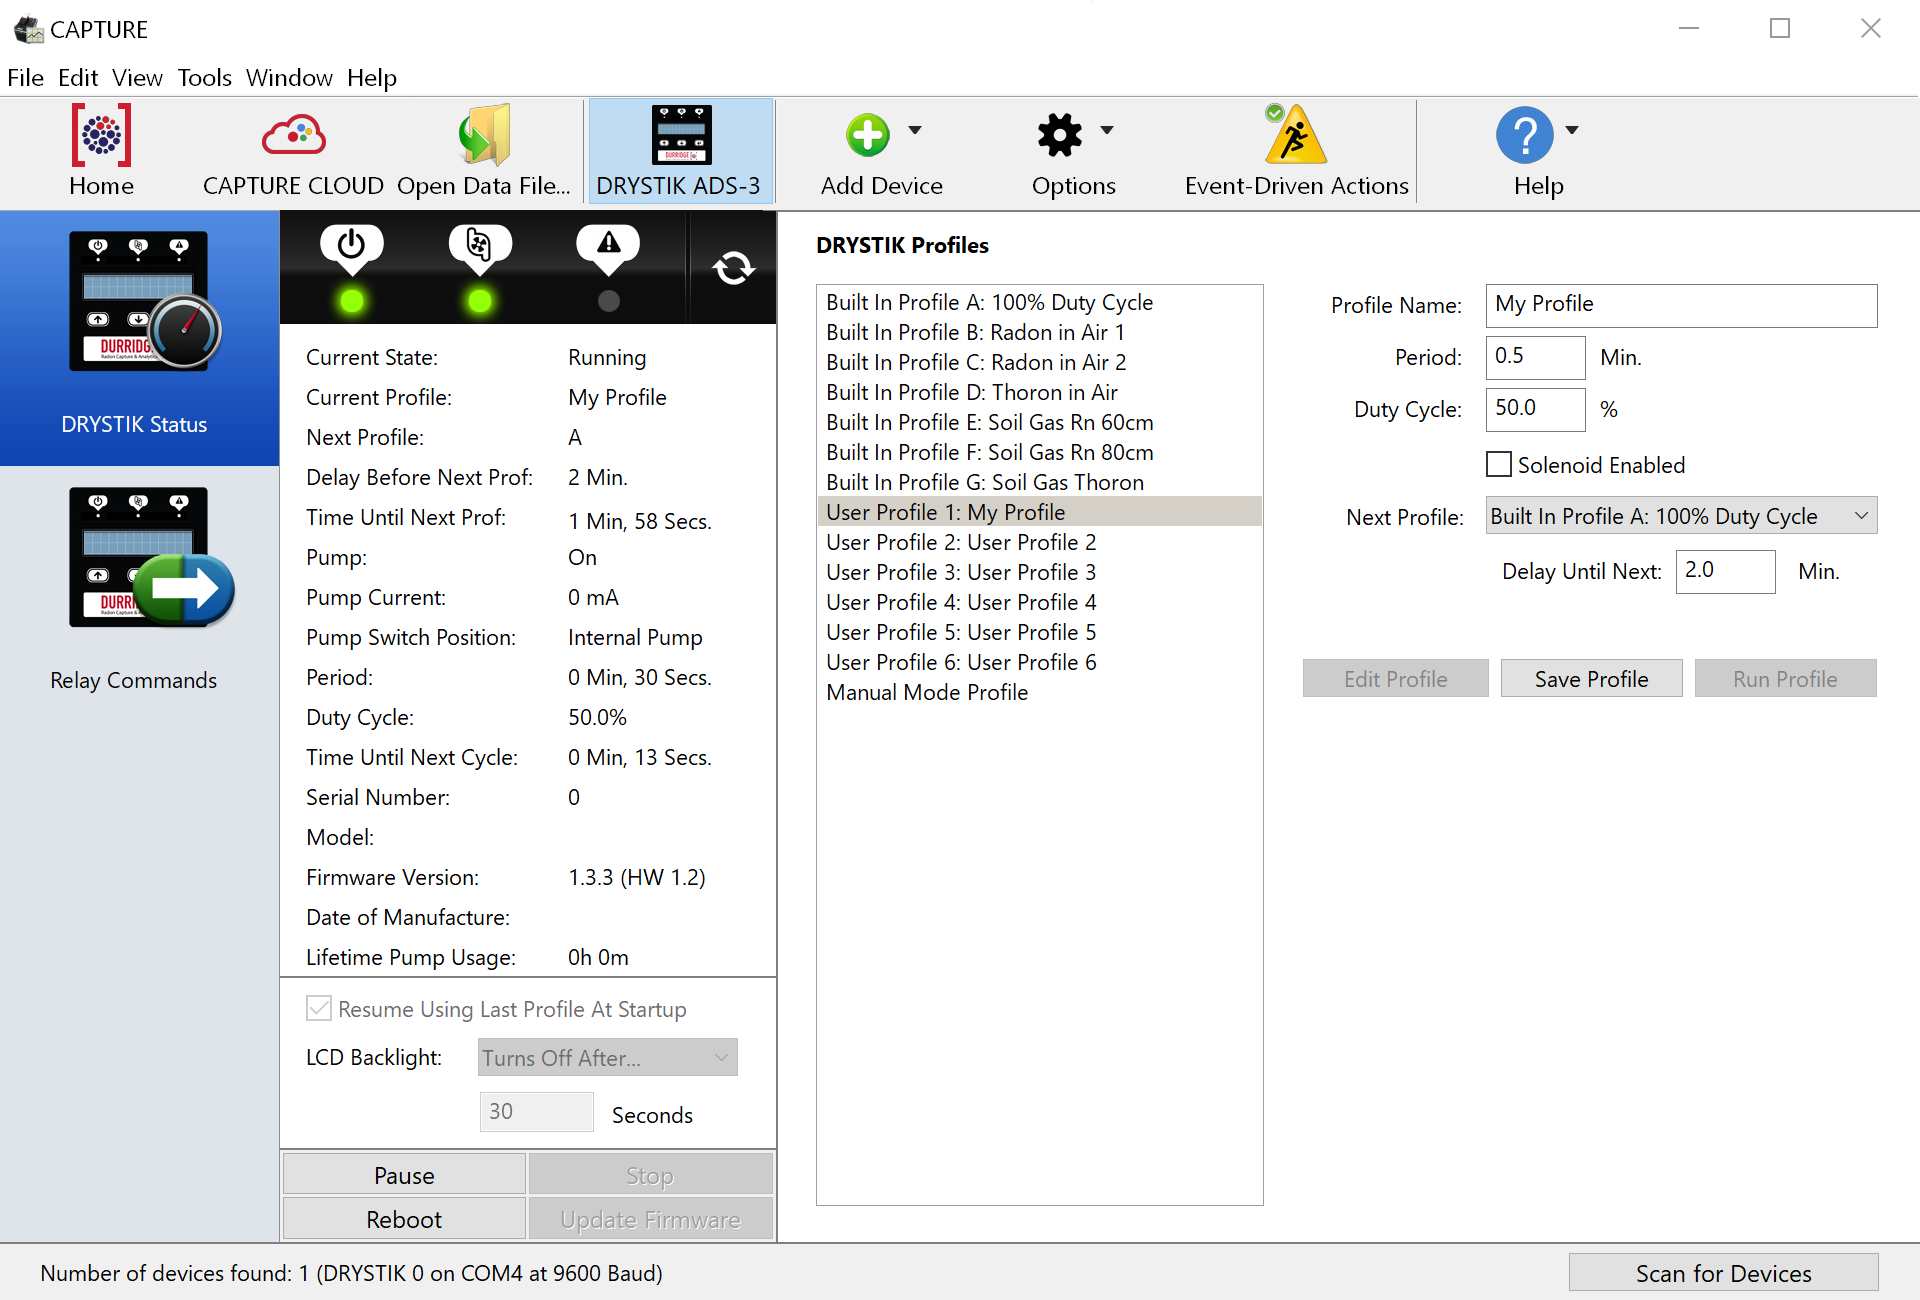
Below the Current DRYSTIK Status panel are several controls for modifying the device's behavior. (Actually running the DRYSTIK requires selecting a profile, as explained in the Configuring DRYSTIK profiles section, below.) Resume Using Last Profile At Startup Checkbox LCD Backlight Pop-Up Menu Pause/Unpause Button Stop Button Reboot Button Update Firmware Button |
|
The right side of the DRYSTIK interface contains controls for configuring and running DRYSTIK profiles, as shown in Figure 3. The DRYSTIK Profiles listbox includes the names of each Built In Profile and User Profile stored in the DRYSTIK, plus a "Manual Mode Profile" which is used when custom settings are needed. To run a profile, select its name in the list and click the Run Profile button on the right. (Profiles can also be selected and run using the membrane switch interface and LCD display on the DRYSTIK itself.) |
|
|
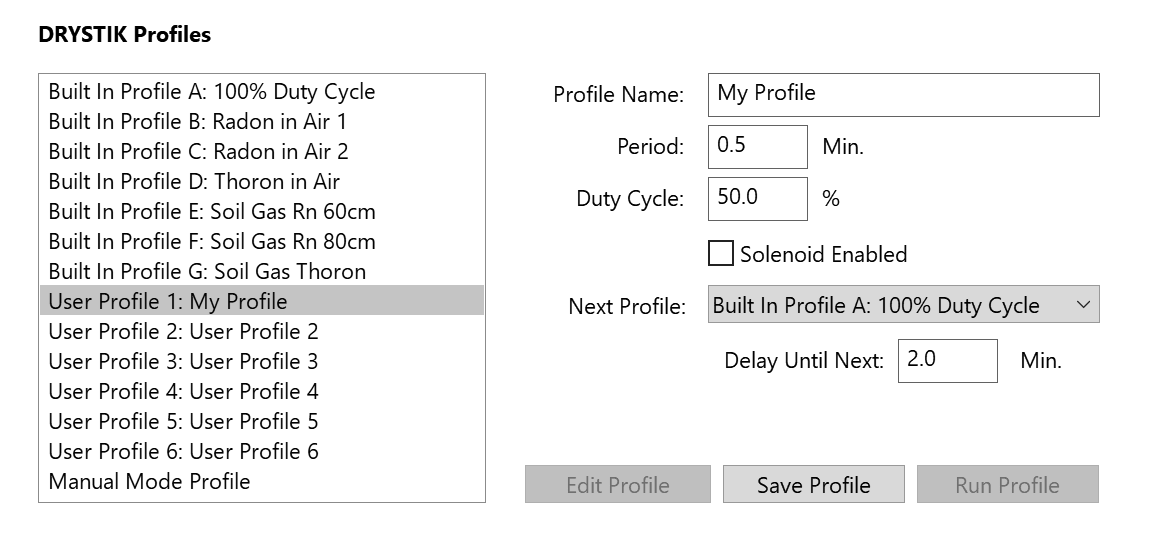 Figure 3: The interface for configuring DRYSTIK profiles in CAPTURE. |
|
To edit a profile, select its name and click the Edit Profile button. This enables controls used to specify the profile's Name, Period, Duty Cycle, and more. Note that only User Profiles and the Manual Mode profile may be edited; the Built In profiles come preconfigured and can not be changed. Once a profile has been edited, click the Save Profile button to confirm any changes. The Run Profile button will then become enabled, allowing the DRYSTIK to be run using the selected profile. Each profile property control is explained below: Profile Name Field Period Field Duty Cycle Field Solenoid Enabled Checkbox Next Profile Pop-Up Menu Delay Until Next Profile Field To make the solenoid turn on and off at regular intervals, configure two profiles, one of which enables the solenoid. Each profile's "Next Profile" should be set to that of the other. The intervals at which the solenoid turns on and off can be controlled by specifying the desired Period and Delay Until Next values for each profile. Since the solenoid can only be on when the pump is active, it is advised that the Duty Cycle be set to 100% for any profile involving an active solenoid. |