ISSUING RAD7 COMMANDS


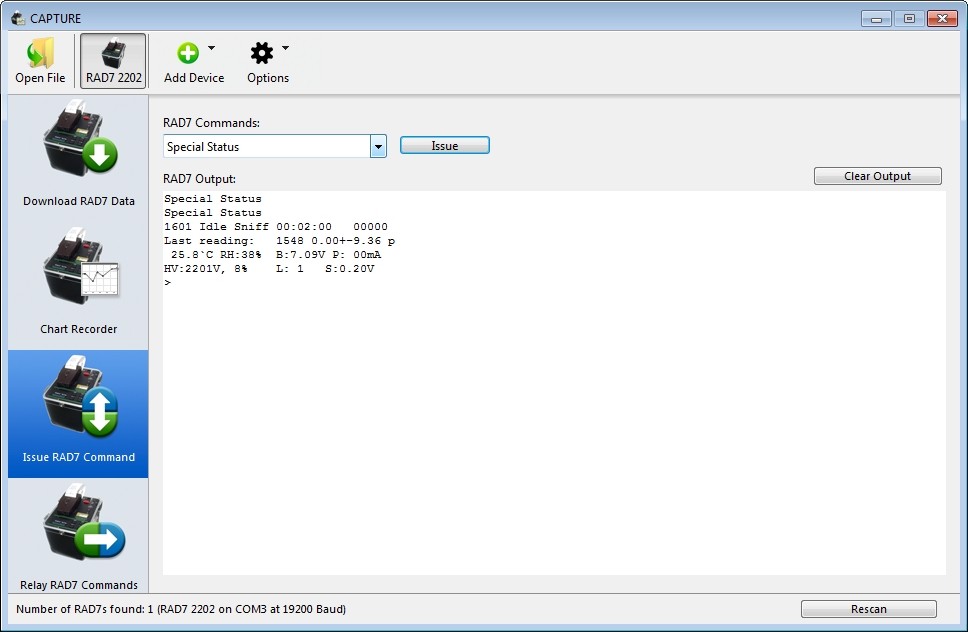
Any RAD7 that has had RADLINK installed may be controlled by a computer. The computer may be connected to the RAD7 directly, or it may be connected via a local network. RAD7 commands allow for much more than the simple downloading of data: it is also possible to start and stop the RAD7, obtain data summaries, configure the RAD7's numerous settings, and obtain the RAD7's serial number and calibration date. In fact, any command available on the RAD7's physical keypad may be issued from within CAPTURE, whether the machine is located across the room or across the continent.


Setting Up  

The easiest way to issue RAD7 commands, albeit the most restrictive, involves connecting the computer directly to the RAD7 by means of a serial cable, and, if necessary, a serial to USB adaptor. This configuration is identical to that used when downloading RAD7 data, and it is described in in the Basic CAPTURE Functionality section.

Issuing commands from a more distant location can be achieved through the use of local area networks. It is not practical to describe every one of the myriad possible network configurations, but typical connection scenarios are explained in the Long Distance RAD7 Communication section. It is recommended however that users first learn how to issue RAD7 commands via a direct serial connection, before moving on to more advanced operations involving networked devices.


CAPTURE Settings 

After connecting the RAD7, launch CAPTURE and select Issue RAD7 Command from the Main Window's Category panel. The Connection Method pop-up menu should be set to the appropriate connection interface, normally Serial Port, in which case the Serial Port pop-up menu should be set to the port containing the RAD7. If no ports are listed in this menu, click the Scan for RAD7s button, in the lower right corner of the Main Window. Any connected RAD7s containing RADLINK will be detected and added to the menu. Once a valid serial port has been selected, a green checkmark icon will appear to the right of the Serial Port pop-up menu.

Next, choose one of the preset commands from the RAD7 Commands Combo Box. You may also enter RAD7 commands not present in the list of presets by typing them manually. A complete list of RAD7 commands is available in Chapter 2 of the RAD7 User's Manual. After a command has been selected or entered, click the Issue button to send the command to the RAD7.

The sent command will appear in the RAD7 Output text area, followed by any response. In the screen shown below, the user has issued the Special Status command, and the RAD7 has responded with details on its current condition.

For another typical example, suppose you wanted to obtain the information that the RAD7 normally sends to its wireless infrared printer. To achieve this, choose "Setup Format Long" from the RAD7 Commands menu and click Issue. Then to initiate the data transfer select "Special SprAll" and click Issue again. (Using the "Long" format ensures that all available details will be included in the transmission.)

Additional commands may be issued at any time, and the contents of the RAD7 Output text area may be copied to any text editor for archival or printing. Alternatively, the text may be saved to a file by choosing "Export RAD7 Output" from the File menu.

Figure 1: Issuing commands via a serial port


Finishing

When the session is complete, the RAD7 may be disconnected and shut off. Any information in the RAD7 Output text area may be copied to the clipboard and pasted into a word processor or other application for future reference.

Note that the above information applies to direct serial connections; additional steps are needed to initiate and complete communication sessions involving local networks. See the Long Distance RAD7 Communication section for details.